How To Start a Successful Blog and Make Money In 2025
January 3rd, 2025
*This post may contain affiliate links, which means I’ll receive a commission if you purchase through my link, at no extra cost to you.
Hi! Welcome. So you’re thinking about starting a blog? That’s so exciting!
Who am I?
My name is Malena, and I’m the creator of this blog which is now my full-time income! I’ve had several blogs over the years, some with minor success. Others, not so much.
The big issue was that my past blogs depended on brand sponsorships. Which is sometimes fun, but also a lot of work.
I have always wanted to create a business where I could make passive income.
Now, I’ve built a blogging business that makes me money with affiliate links and display ads. No sponsored posts!
I have finally found a way to make my website work for me, and I want to teach you to do the same.
Blogging Resources I Use That Make Me Five Figures A Month
My Viral Pinterest Strategies Ebook Course Sharing all my Pinterest secrets 🙂
My 5 Viral Pinterest Templates To Drive A Ton of Traffic
Chapter 1
What is a blog – and how do I find a profitable niche?
Disclosure: I started Malena Permentier on Bluehost. I’m an affiliate with Bluehost, which means I will get a commission from them if you use this link.
This is one way I can make my site profitable and keep this guide up to date. I only recommend products and services that I’ve personally used and love!
What is a blog?
A blog is an online website that you regularly update with new posts, for example, twice a week.
When using the correct blog strategy, your content will get shown to your target audience.
That allows you to make money through display ads and affiliate links.
Should I start a blog?
Absolutely! I think blogs are a powerful way to make money and build a business that can grow with us over the years.
But I’m going to make it sound easy because it’s not.
Making money from a blog requires a SIGNIFICANT investment of time. So make sure you’re 100% ready for that.
How long does it take to make money from my blog?
According to Blog Tyrant, 70% of blogs never make any money. Or at least not enough that it would significantly change their lives.
Yes, that’s a sobering statistic. So if you’re thinking of starting a blog to make money fast, don’t do it.
Starting a profitable blog is hard.
It’s normal to start a blog with a romanticized idea of what it will be like. That is okay, as long as you’re willing to adjust to reality!
During the first months – perhaps even most of the first year, you’ll feel like you’re talking to the wall.
Unfortunately, the money won’t simply come rolling in after you’ve published a couple of posts, or even 20.
In the first months, you’ll:
- Question your blog and your writing 100 times. You are not getting any traffic, so that must mean you’re doing something wrong.
- Feel frustrated by how much time it takes to put together a blog post and fix little things on your WordPress site.
- Ask yourself why you’re doing this, feeling completely overwhelmed by how much you don’t know.
- Feel like quitting. Most people that start a blog quit at some point during the first year. They didn’t adjust their expectations to reality.
If you’re in it for the long run and want to start a successful blog that makes money, work hard without expecting to earn money for at least 1 year.
Still say yes to the commitment of starting a successful blog? Then keep on reading.
How to pick your blogging niche
When I started my blog, I had one thing very clear. I wanted to write about things I liked, but I also wanted to choose a niche to make money.
I decided to go with a 3 pillar niche, which means that you pick 3 main topics to write about – and stick to only writing content that fits within one of those main categories. Mine is apartment decor, organization, and small spaces.
Before you start a blog that makes money, you must clarify what you want to write about.
How do you decide what to write about?
Starting a blog as a “passion project” is not a clever strategy for starting a blog that makes money.
Keep in mind that the internet has been around for a while, meaning you can find about a zillion blog posts for the most profitable niches.
That is not to discourage you; the point is: successful blogs are successful for a reason. Most of the time, they’ve done an excellent job at writing about a particular niche and solving people’s problems.
Ultimately, it’s about this question: “What do people search for on Google, and who answers those questions in the best way?”
Google has become more advanced over the years, getting to a point where it perceives content almost as a human being would. It always prioritizes in-depth, insightful content.
Now let’s take a moment to understand how Google works from a blogger’s perspective.
Think about the things you type into Google:
- Quick dinner ideas with mushrooms and rice
- How to start a blog that makes money
- Living room ideas for a small apartment
- How can I make money from home
A powerful way to understand what people search for in Google is to experiment with “to,” “with,” “for,” and “from” questions.
That gives you a good insight into what people are looking for. What questions do they want to be answered? How do they ask those questions?
When you first start blogging, it’s wise to keep your niche very small. That way, you can build up content quickly and make it easier for Google to understand what your blog is about.
The best niches that will make you money
Some niches are indeed easier to make money in. That has to do with many reasons, but it comes back to one simple reason.
Specific niches are easier to make money when you keep in mind that the primary sources of revenue coming from a blog are:
- Affiliate marketing
- Your own digital products
- Display advertising
With that in mind, let’s explore a couple of profitable niches that can make you money quickly.
That is not to say that other niches can’t make you money, but generally, it will take you more time.
1. Home Decor
I love this niche because it’s enormous, visual, and creative. It’s also a great money-making niche if you narrow down the topics. Home decor is a massive niche. You can write about small apartments, first apartments, decorating on a budget, best home decor DIY’s and so on.
For a niche this broad, it’s smart to have a clear idea of who you’re going to write for. Is it new homeowners? Young people, who’ve just moved into their first apartment?
Some of my favorite blogs in this niche:
- By Sophia Lee (made $43,225.37 in May 2020 on a blog started in 2017!)
- Jojotastic
- A Beautiful Mess
2. Personal Finance
Oh my, this is a big one! Personal finance is a very profitable niche in terms of affiliate marketing. There are a lot of courses, books, and products you can use for affiliate marketing.
It’s also a topic, which I believe that you’ll only make money if you genuinely love writing about it.
Remember that this niche requires a lot of research, trying, and testing.
Some of my favorite blogs in this niche:
3. Parenting
I only recently realized what a profitable niche this is. When you think about it, it only makes sense parenting blogs are so popular.
Some of my favorite blogs in this niche:
- Mommy on Purpose (Made $14,077.90 in December 2020)
- What Moms Love
- Twins Mommy
4. Food
I love food blogs, and this is a great money-making niche. After all, we need to eat every day. I adore Minimalist baker; it’s my favorite resource for healthy vegan recipes.
Some of my favorite blogs in this niche:
- Pinch of Yum (Made over $100.000 in November 2016)
- Minimalist Baker
- Cookie and Kate
5. Blogging and Marketing
I used to be a little skeptical: bloggers blogging about how to make money? Sounds like a scam.
However, I understand now. Refining your blog strategy to make money takes time, effort, and adaptability.
Once you start understanding specific algorithms, sharing all you know about them is exciting. Plus, the blogging and marketing niche is a profitable one.
Some of my favorite blogs in this niche:
- Melyssa Griffin (Made $283,680 in December 2016 of which net profit $191,146)
- Allison Lindstrom
- Love Family Health
6. Lifestyle
I wasn’t sure whether to include this niche because ‘lifestyle’ isn’t the most accessible niche to make money.
However, if you do it well, there is always a place for you!
Some of my favorite blogs in this niche:
7. Fashion & Beauty
I want to state something essential: many fashion & beauty blogs have either a sponsored post OR an affiliate earning model.
If you want to make money in this niche starting from scratch, I HIGHLY recommend focusing on a website with affiliate marketing.
When we look at successful fashion & beauty bloggers, we think that sponsored deals and Instagram are THE way to make money. Remember that those rules don’t count for you as a newcomer. So don’t try to compete!
Instead, focus on what you can control. Which is 1) Your website 2) Google 3) Pinterest 4) Affiliate Marketing.
I believe there is a lot of potential in this niche if you focus on starting a website rather than an Instagram.
Some of my favorite blogs in this niche:
- Chic Pursuit (Made $3,300 in July 2019)
- We Are Twinset
Advantages of a small niche
To start a blog that makes money, you must think about the niche you will write about.
The smaller your niche, the easier it is to make money online. Let me illustrate.
Small Niche Example:
Sophie’s new blog writes 30 in-depth articles about small apartment living. She talks about small living room ideas, organizing small spaces, clever storage ideas, and much more.
Google bots scan Sophie’s website and can see quickly what this website is about. They see that there’s plenty of quality content about small apartments.
Cindy’s lifestyle blog also has content about small apartments. But her website also covers beauty tips, fashion, travel, and a bit of personal finance.
Google considers Sophie’s website more relevant than Cindy’s because it covers one topic in-depth. Therefore, it ranks her website higher regarding this topic.
This is a very simplified example, but especially when you’re starting with a brand new blog, keeping a small niche can be a great strategy to get your blog off the ground and make money ASAP.
How to start a blog from scratch with 0 followers and 0 traffic
My advice is ESPECIALLY for brand new bloggers.
I emphasize this because I’ve read so much “how to start a blog that makes money” content that is not useful for new bloggers – sometimes it’s even plain inaccurate.
On the other side, we’ve arrived in the “Influencer century,“ where we often overlook the internet offers many opportunities to make money without having a public face.
Although having a public face can be part of your blogging business, as a new blogger wanting to make money, your focus shouldn’t be there.
Let’s be clear on what we’re doing here:
- You want to start a blog that makes money, mostly through passive income like affiliate marketing and ads.
- You aim to make at least $1000 monthly after a year of blogging.
- You’re in it for the long run, meaning you want a monetization strategy that compounds over time.
Chapter 2
The tech stuff: setting up your blog
Getting your blog online might seem overwhelming, but it’s much easier than you think. Below I’ll walk you through the exact steps you have to take to have your blog online within a day.
1. Pick a domain name
A domain name is your website’s name. When choosing yours, keep in mind:
- Make it catchy and memorable
- Choose something timeless. Will I like this name 5 years from now?
- Use a word related to your niche (power move for SEO!)
In 2023, many catchy domain names are already taken. To see if your pick is still available, check it here.
That will land you on the Bluehost domain name check page.
July 2023 Update: Several of my blog readers contacted me that when they choose a domain name on Bluehost, it charges them an insane amount, like $999 for the domain name.
This is because the domain name is already taken! So then you’re paying to buy the domain from someone else.
Purchasing a new domain name should not cost more than $13.
And I do recommend that you get a straight .com domain. So not a .blog or .store.
If your first choice is taken, just play around a little with the words and pick something else. Unless you really love your first choice of domain name & have $999 to spare. But I sure I did not when I started my blog.
You can always send me an email at contact@malenapermentier.com if you’re unsure about something. But please don’t spend an insane amount of money when you don’t have to 🙂
If you’re having a hard time choosing a name, write down words that you think of when it comes to your blog.
Words like power, inspiration, live your best life, healthy habits, the best self might seem cheesy, but as you write them down, you might find a holy grail combination of words or an invention you love.
For many people, starting a blog under their name feels too exposed. And I understand. But there’s only one of you, and what you have to say is important, so why not use it?
Get your domain + hosting today!
It only takes a minute to register your domain name and purchase your hosting with Bluehost. This is the hosting company I used when I first started my site. You get a FREE domain name when you get a hosting plan for at least a year!
[Get Domain and Hosting]
2. Choose the right blogging platform
To have your blog showing up online, you need to choose a blogging platform. By far, the most used platform is WordPress. However, there are other platforms as well:
- WordPress.com (free. Your website will have a URL that looks like: my blog.wordpress.com)
- WordPress.org (the same software, but you need to install it on your web host)
- Wix
- Squarespace
You don’t have to pay to have your website showing up online at a free blogging platform. These are the downsides:
- Your website URL will look like myblog.blogspot.com or myblog.wordpress.com instead of mynewblog.com
- You don’t own your website – these free platforms have a lot of small letters in their terms & conditions which say they can do with your website what they want.
If you want to start a successful blog that makes money, you must choose self-hosting.
Self-hosting means that you’re buying space on a server to have your website showing up online.
I recommend getting self-hosting because you just set up your blog professionally from the start – and save time and money in the long run.
WordPress is by far the most versatile blogging platform you can choose. As a beginner, it’s perhaps not the most accessible platform. But I promise it’s worth it in the long run because you’ll be able to manage everything on your own.
Because WordPress is so widely used, there are many helpful Youtube videos for every question that you might have.
3. Buy Hosting
After picking a domain name and choosing your blogging platform, it’s time to buy your hosting.
What is web hosting exactly?
You pay a hosting company for getting your website to show up online and store data.
You must choose the right hosting company because you want your website to load fast and give your readers a great user experience.
How much does web hosting for my blog cost?
Web hosting is very affordable, even for new bloggers who don’t want to spend much money on their website.
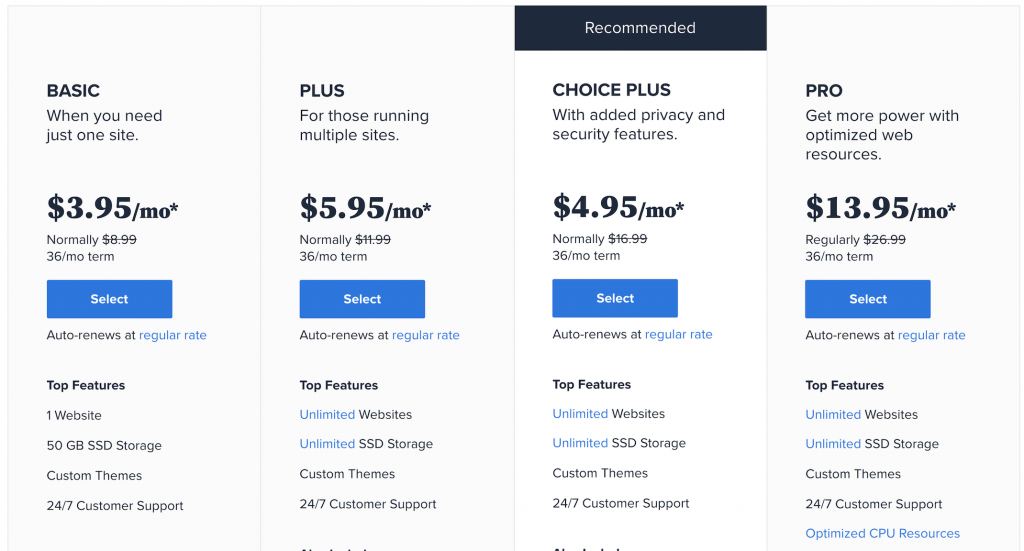
At Bluehost, you can get hosting for as cheap as $3.95 per month. I recommend getting the option that’s around $4.95.
That’s because you can get a shorter contract when you pay a little more. If you want to change your hosting after a year, you can.
I think it’s important to mention this because you might need something called ‘a dedicated server’ as your traffic grows.
Not to worry, you’ll be more than fine on a cheap hosting plan during the first and second years.
When I first started blogging, I chose Bluehost after comparing at least 20 different hosting providers.
Reasons Why You Should Use Bluehost:
- It has the best affordable hosting plans, which is great for new bloggers.
- When you sign up for a 12-month hosting plan, you get a FREE domain name!
- WordPress.org recommends Bluehost as the number 1 Hosting Company.
- The customer service team has always been SUPER helpful in answering my 1001 questions.

4. Choose your plan
Now it’s time to select your plan. Below I’ll show you step by step how exactly you do that.
- Click here to head over to Bluehost and click on the black button ‘get started’
You’re now on a page that shows you the different hosting plans. You have a plan for 12 months, 24, or 36. It looks like this:
2. Select your plan
For new bloggers, I recommend the Basic Plan for the period of your preference. You can always upgrade to a plan with more data as your blog grows, so don’t worry.
3. Enter your domain name
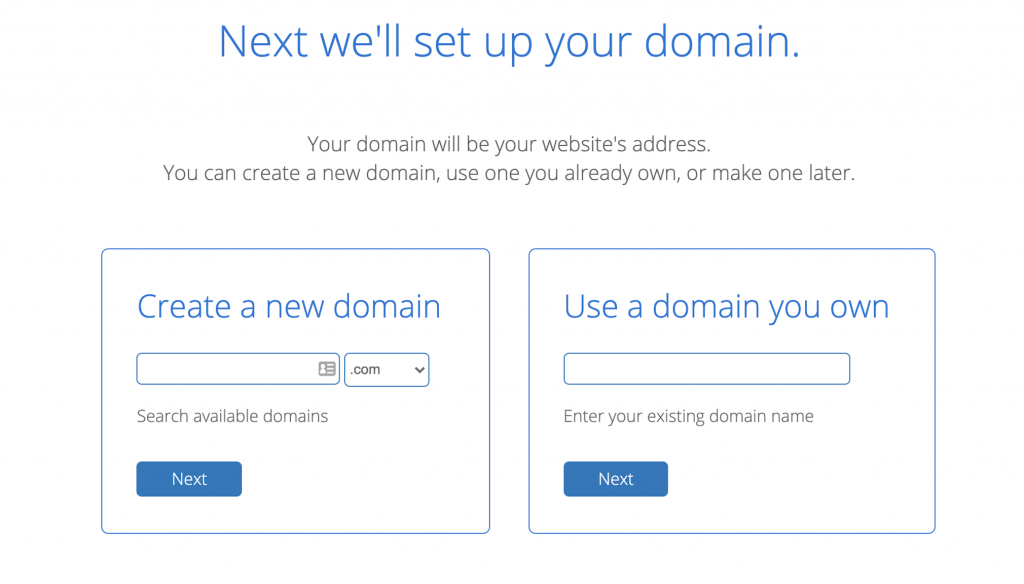
Your domain name is your website’s name. When you fill it out here, you get the domain name for free with your hosting!
Type the name of your new blog and click next. You can also choose your name later if you need a little extra time to think about it. In that case, click “I’ll create my domain later.”
Already have a domain name?
For example, if you already own a domain name at Go Daddy, you can easily link that domain name to your new hosting.
To do this, choose the option on the right where you fill in the domain name you own. You will then connect that name to your Bluehost account.
Now log in to the domain provider and follow the instructions to connect your domain to Bluehost. You can usually do that at the Account Manager Page with an authorization code.
4. Create your Bluehost account
Next, you’ll get to a page where you must fill out your details. Here you see what’s included in the package and possible extras.
To keep your hosting as cheap as possible, untick the boxes with extras.
Which pricing plan should I select?
Bluehost currently offers a 12, 24, or 36-month plan. The longer your plan, the lower the price. It depends on what you feel comfortable about, but I recommend going for at least 12 months. I’ll explain why:
- You must give yourself at least a year to create a blog that makes money. Investing your money in a year of hosting creates a commitment that will keep you accountable.
- The monthly price is much cheaper when you purchase at least a yearly plan.
- You will receive a FREE domain for the first 12 months.
- If you get a monthly plan, it’s easy to forget when to renew it. In your first year of blogging, there is so much to do that you don’t want to worry about this.
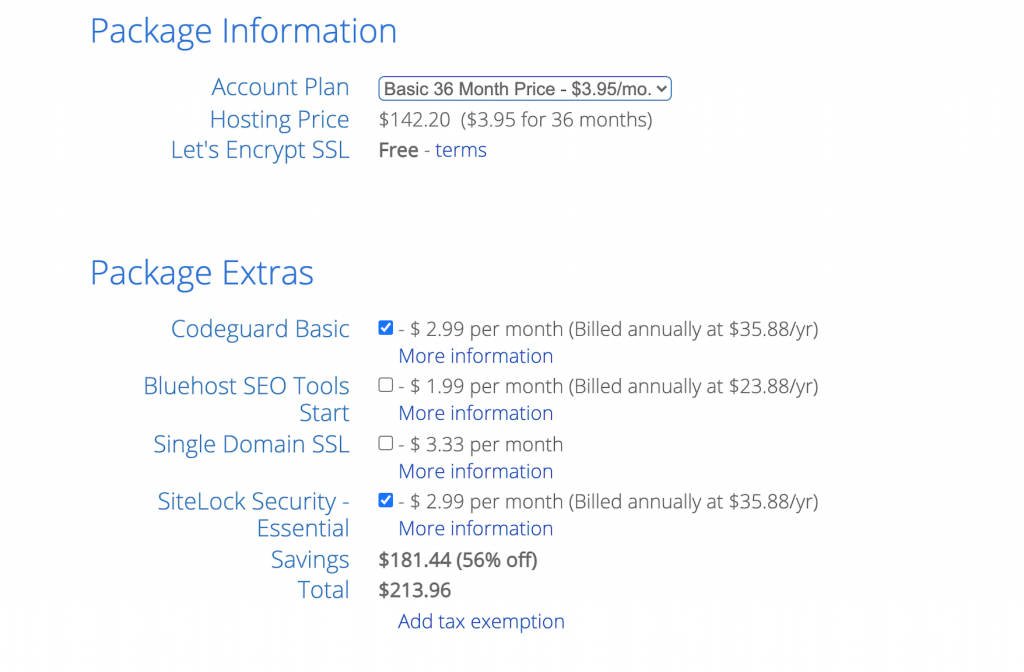
I like to invest as little money as possible when starting a new business. That’s why I didn’t purchase any of the extras. It worked out fine for me.
5. Install WordPress
Once you have your Bluehost account set up and your domain name connected, it’s time to install WordPress!
Not to worry, your only job is to click ‘install WordPress, and the rest will take care of itself.

If at any point you’re unsure how to proceed, click on the live chat, and a Bluehost customer service representative will come to the rescue 🙂
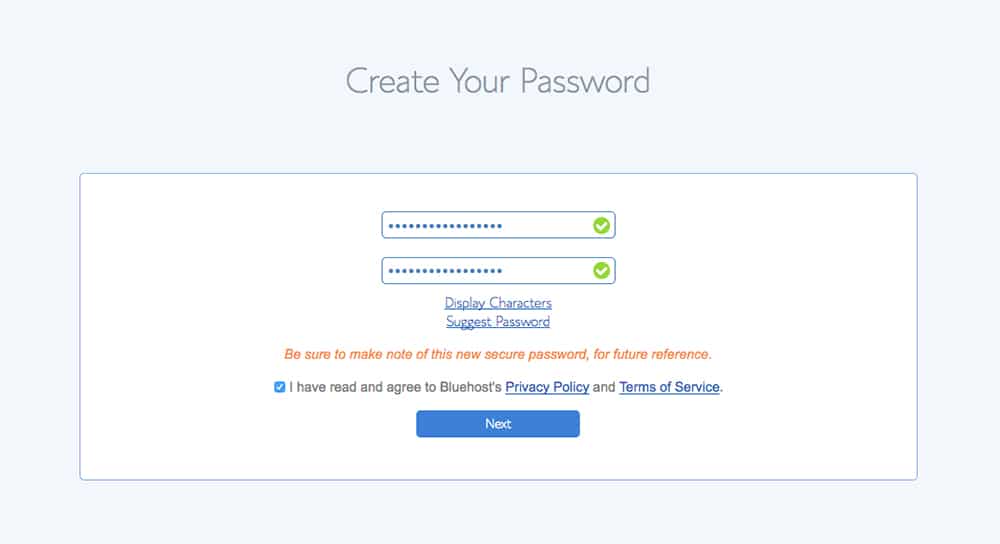
You’re almost there!
After installing WordPress and selecting a password, you’ll have the option to choose a theme for your blog. We’ll get to this in step 6.
TIP: When selecting a username for your WordPress login, pick a name that’s not hack-sensitive.
So instead of using your domain name, go for something a little harder to guess. E.g., yourname120303
Here you can either pick a theme or click Skip this Step.
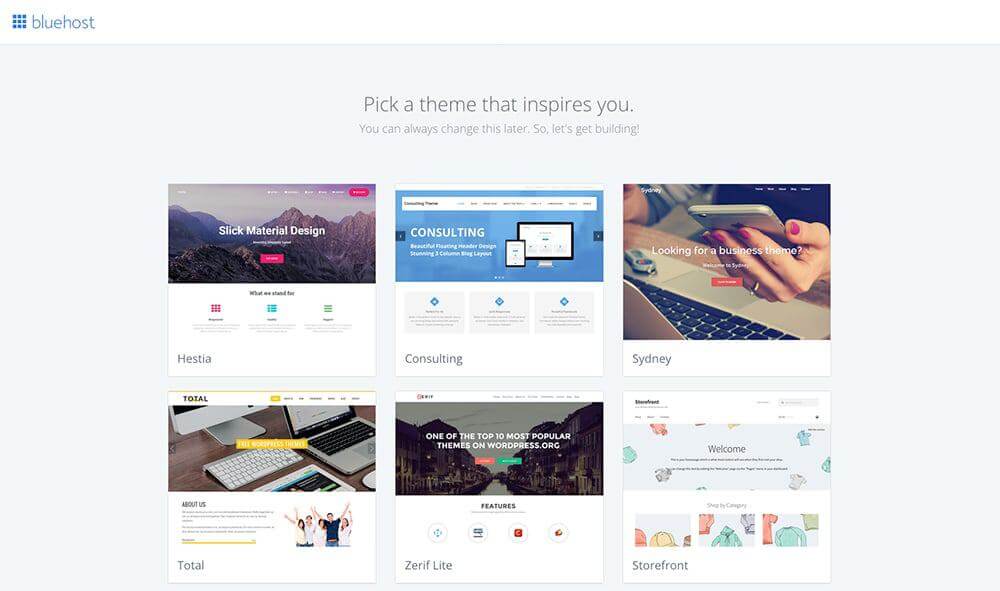
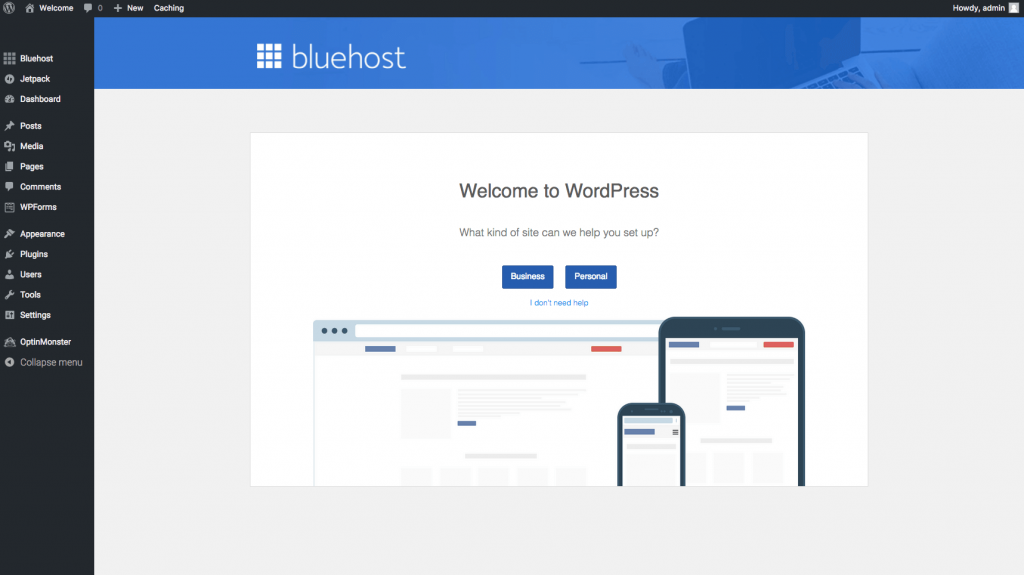
When you’re done, you click Start Building.

You’ll now be redirected to WordPress:
6. Let’s get familiar with WordPress!
To log in to the backend of WordPress and work on your website, add /wp-login.php after your domain name.
If I want to log in to my website, I type in: in malenapermentier.com/wp-login.php.
You’ll now have to type in your WordPress username and password.
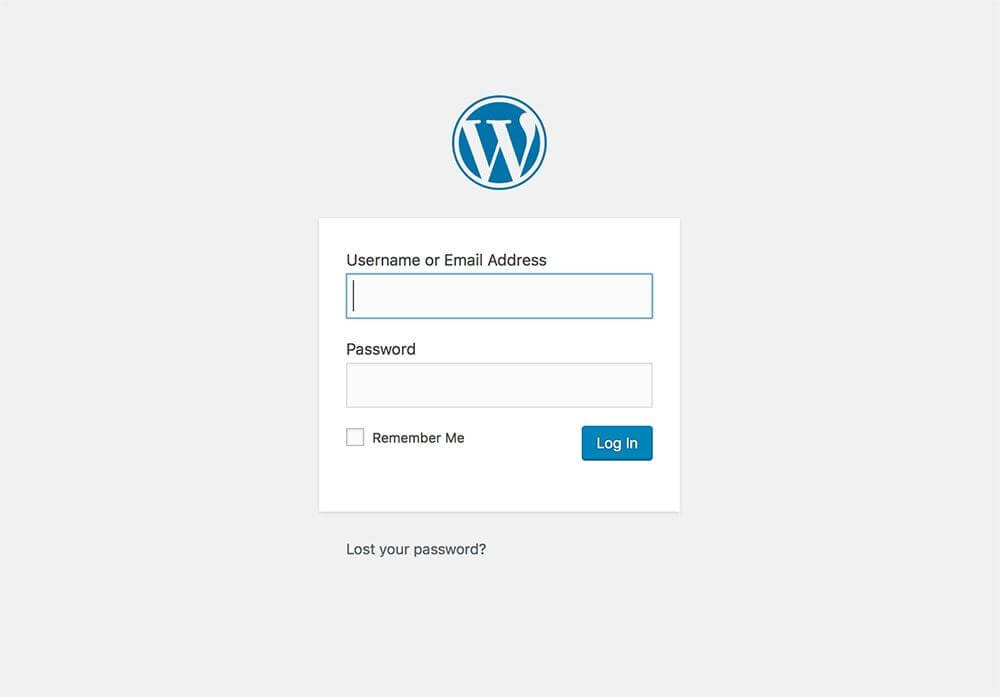
NOTE: Connecting your hosting to your domain name might take some time. Therefore in the first 24-48 hours, you might not be able to log in to WordPress directly.
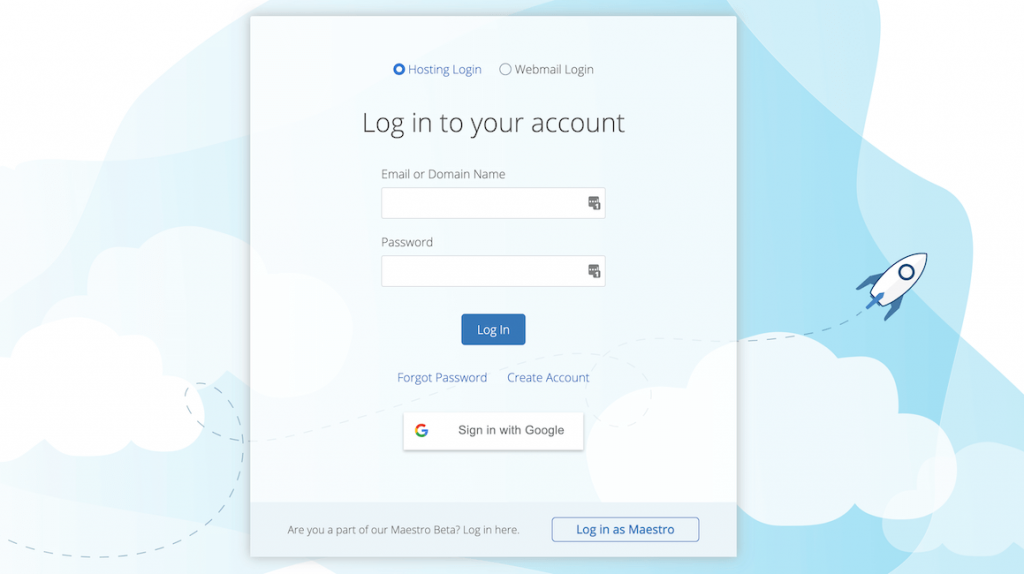
Luckily you can immediately log in to WordPress via Bluehost. Go to https://my.bluehost.com/ and log in.
For the first 24-48 hours, you will not be able to log in to WordPress directly.
Assigning your domain and redirecting your website to the correct web address will take time. If you don’t see this screen, you can log in to your Bluehost account by going to https://my.bluehost.com./
Now click on the blue bar Login to WordPress.
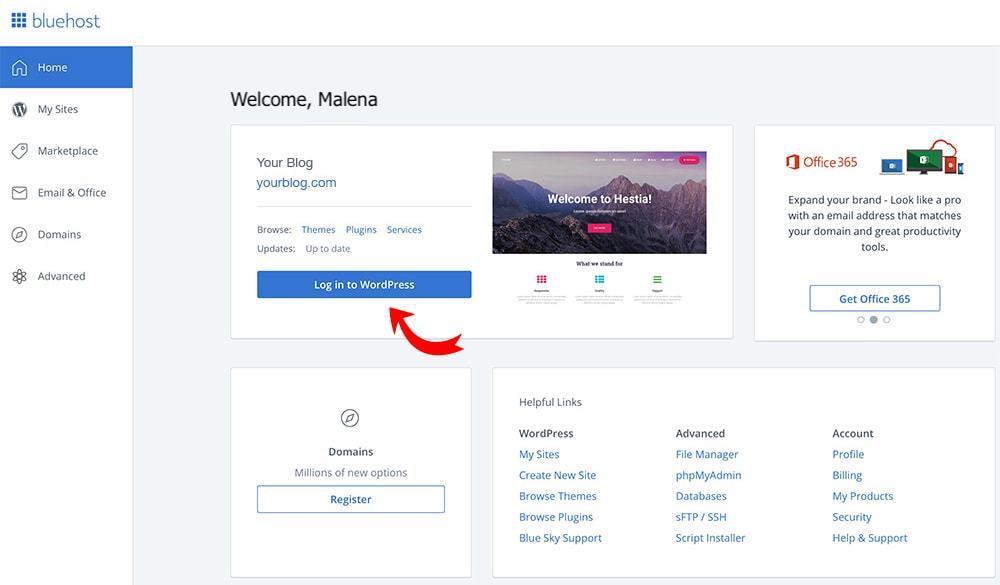
You are now logged into the WordPress Dashboard. Yay!
This is where you’ll spend a lot of time in the upcoming weeks. I know it might seem overwhelming initially, but you’ll get the hang of it before you know it.
Your WordPress dashboard looks something like this:
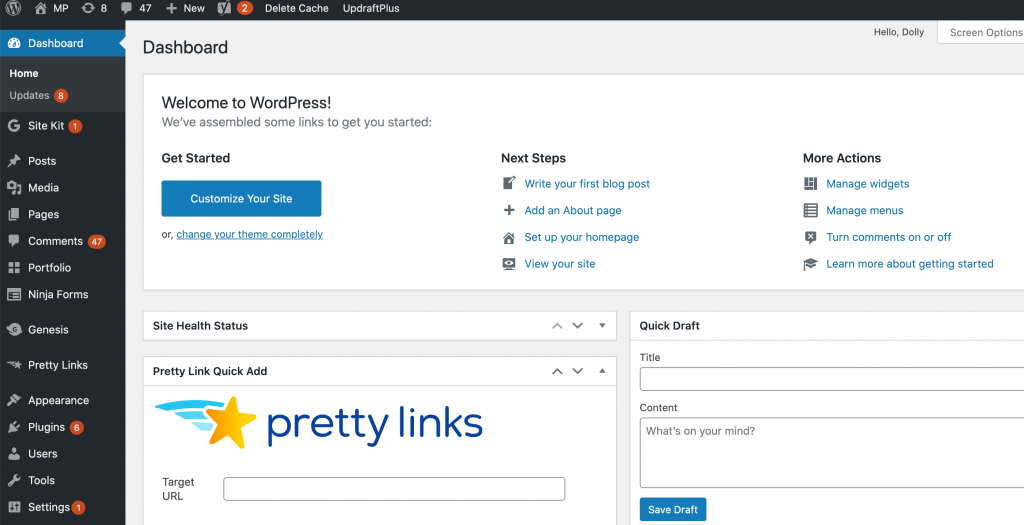
First, you’ll want to get familiar with the menu options on the left sidebar. You might not have everything look precisely like mine, not to worry.
Posts: this is where you’ll be spending lots of time! When you hover on this button, you can click on a new post. This is how you start posting on your blog.
Media: if you want to upload images to your blog, this is where you need to be. Upload your pictures in the library to use them for your posts or your about page.
Pages: here, you create new pages that make up your website. For example, your about page, contact, privacy policy, etc.
What is the difference between pages and posts?
Pages are used for timeless content, for example, your about page or privacy policy.
Posts are the blog posts you post. They show up on your blog page and have a publication date.
Tip: If you write a very extensive post with 2000+ words and it’s one of your blog’s pillar topics, make it a page.
According to Google, a page doesn’t automatically have a better place in the hierarchy. However, that doesn’t mean it can’t be a vital asset in your blog’s pillar strategy.
Let me give you an example:
- How to start a successful blog that makes money (pillar)
- Crucial blog tips for beginners that nobody tells you about
- Step-by-step guide to affiliate marketing
- How to create a Pinterest strategy from scratch
- The best SEO tips to become Google’s friend
This post is the most crucial pillar within my category, “blogging.” The posts all exist as their valuable content and support the pillar post by linking to it.
Differentiating between pages and posts makes it handy to keep track of your website’s structure and how well you optimize it for SEO.
Comments: Here, you can see the latest comments on your blog posts – and moderate them. When you first start blogging, you likely won’t have to be here a lot, but as you grow, it will become an essential part of your job to interact with your readers!
Appearance: A very important one! You’ll spend a lot of time here, especially when starting. Here you can customize your site, change your header, and add widgets—more about that a little later.
Plugins: Plugins are minor additions you can make to your WordPress blog by downloading a plugin. You have plugins for Google Analytics, SEO, your email list, and much more. I’ll get to this in Chapter 7.
Users: Here, you can create a username and password for other people you possibly want to access your blog, for example, a developer.
Tools: I had to look hard to know what this was for. That means: you won’t need it often! At tools, you can import/export data from your blog.
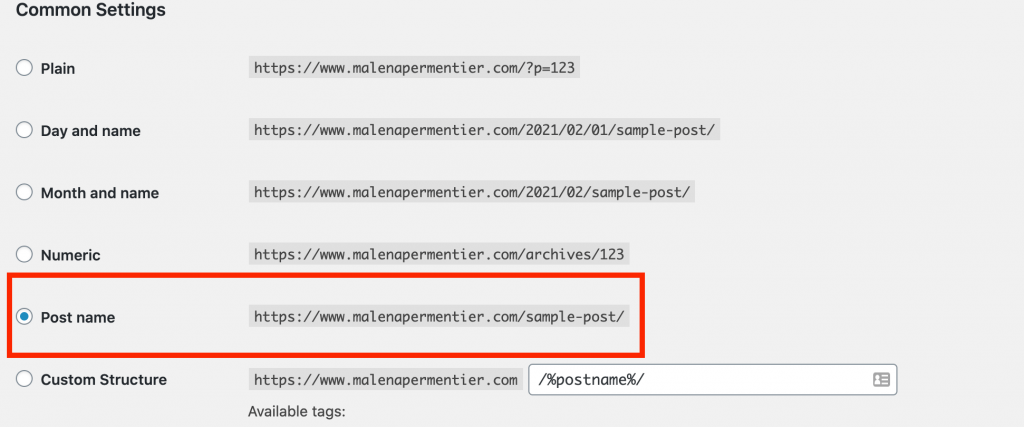
Settings: One of the essential things at Settings is the URLs of your blog posts. It’s crucial to get this right from the start, so first check that your settings look like below:
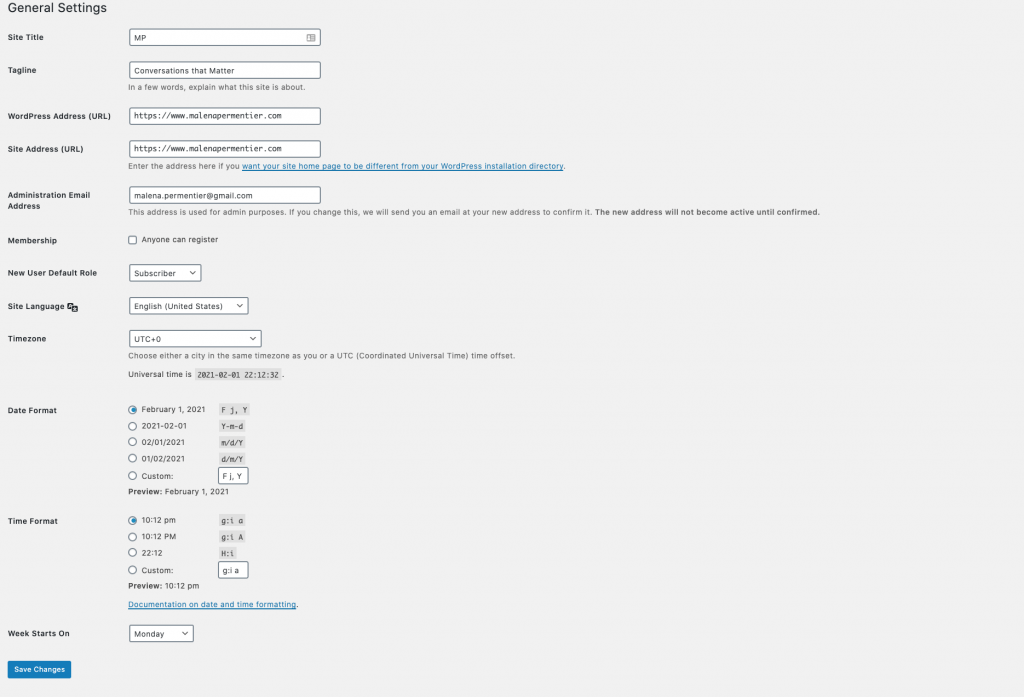
General
Site title: This is where you fill out the name of your website. I have my initials there, ‘MP.’ Your readers will see this in the top left corner of your website.
Tagline: Include a phrase that describes your website. You can utilize this for SEO, so if you want, use keywords that you’re looking to rank for in Google. I picked more of a “branding” phrase: Conversations that Matter.
Other than that, you don’t have to do much here. Simply check the settings and if you want to change something, do it.
Permalinks
The next one that is important to check under settings is permalinks. Permalinks refer to your URLs and what they look like.
Here’s an example of what you don’t want:
malenapermentier.com/category/productivity-0102-nameofpost
This structure is not great for Search Engine Optimization (SEO)
What you want is a permalink structure with your post name. In this day and age, WordPress usually does this by default. But before you start publishing your post, make sure you check settings>permalinks.
You’ll want to see a check-in post name, as seen below.
7. Choose your theme
This is where the fun starts – at least, I think so! It’s now time to select a theme for your blog.
Here’s what’s important:
- Make it efficient: Go for a simple template that takes care of your readers’ essentials like sharing buttons and a straightforward user experience.
- Responsive: This means you should go for a template that looks great for your readers on any device, desktop, or phone.
- Versatile: You want a template that allows for changes to be made easily. Perhaps you want a different home page or add a new feature. You want a template that allows for those changes.
- Customization: In the light of versatility, you also need a template that is easy for you to customize in the back end. This is truly a game-changer. People lose so much time with fancy templates that are hard for them to customize.
- Support: Are the makers of the WordPress template available for support if something goes wrong? Very important, because in my experience there is always something you need help with.
How to Pick the Best WordPress Theme for you
I recommend doing your research thoroughly. Read reviews, see what other people have to say about it. Above all, only get a template that you’re truly confident about.
After doing a ton of research, I went for the Vivienne template from 17th Avenue Designs, and I’m delighted with my choice. This template runs on the Genesis framework, which you get for free with the template you purchase.
What I appreciated is the excellent support 17th Avenue Designs offers. They have many valuable resources on their site, including tutorials for WordPress, Plugins, and How to Customize your theme. I kept coming back to the useful CSS codes to customize my theme.
I initially bought the Harper template from 17th Avenue Designs, and although I love the style, it wasn’t right for the business I would create.
Vivienne has a better overview and smaller thumbnails. That makes it easier for readers to explore my website and keep on reading. The Harper template focuses more on imagery, which is beautiful but is not the main focus of my business.
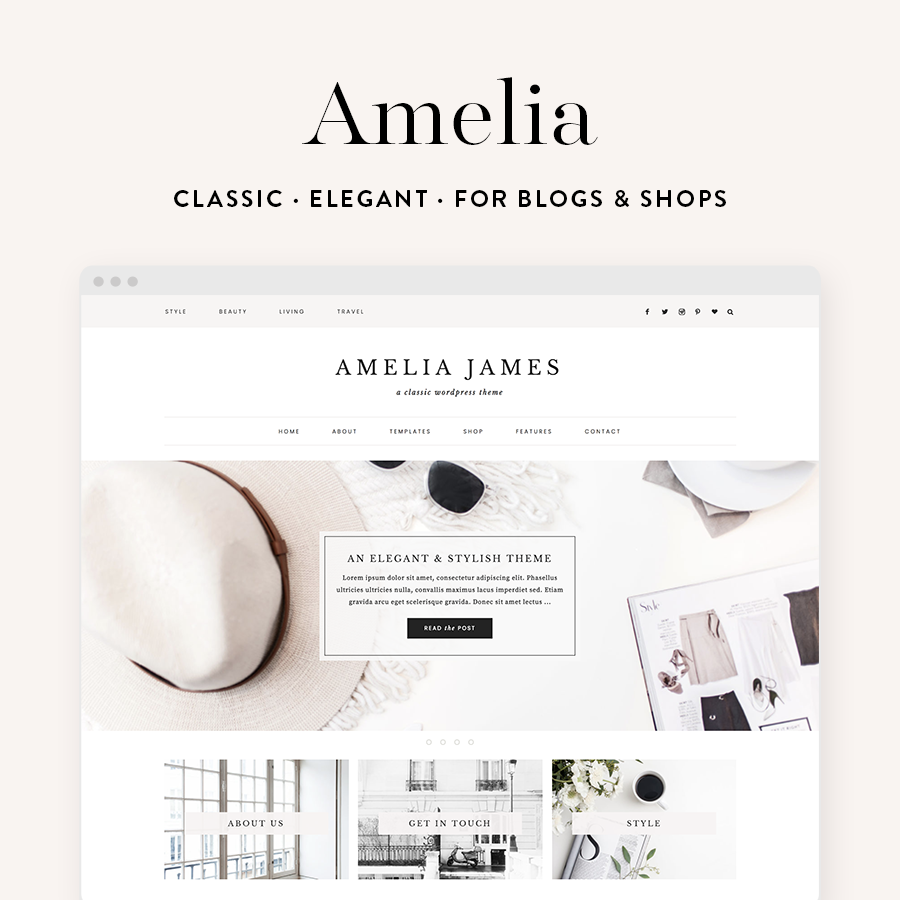
Below you can see a little preview of the Amelia James Template, which is also STUNNING!
8. Uploading your theme to WordPress
After purchasing a theme, for example, at 17th Avenue Designs, you receive a link to download your theme.
After downloading the theme, you should unzip the file to access the files inside.
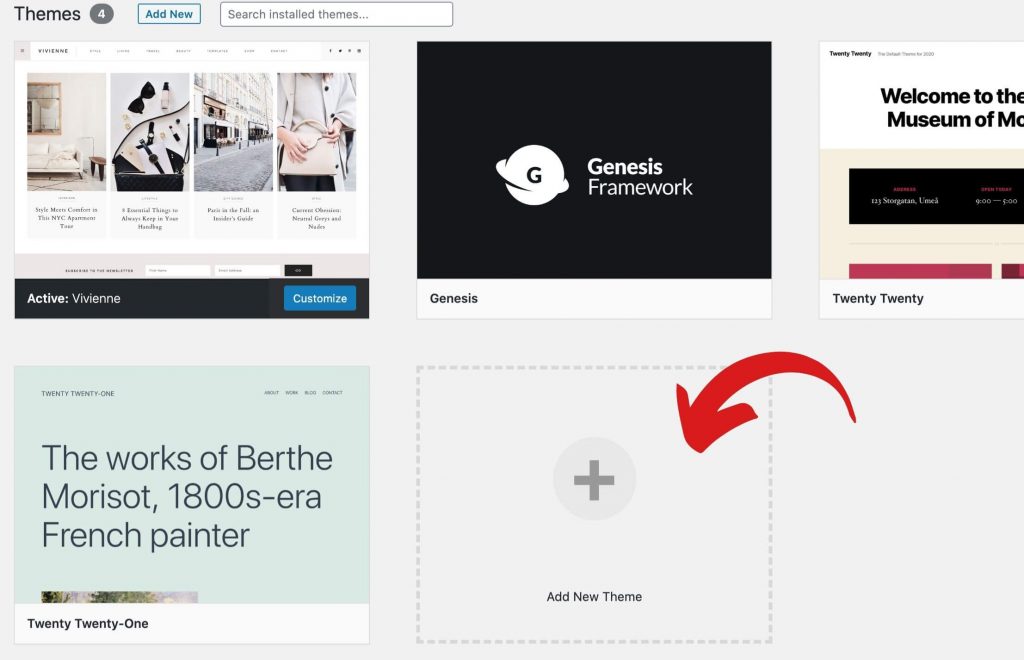
Now go to WordPress>Appearance>Add a new theme. Upload the theme files according to the instructions.
Below you can see where you upload your theme. WordPress automatically installs one of its default themes. You can keep that one there. If you ever have a bug in your current theme, your website will fall back onto the old theme.
9. Customize your theme
Now that your new theme is up and running, you’re ready to customize it to your needs. Luckily, that’s very easy.
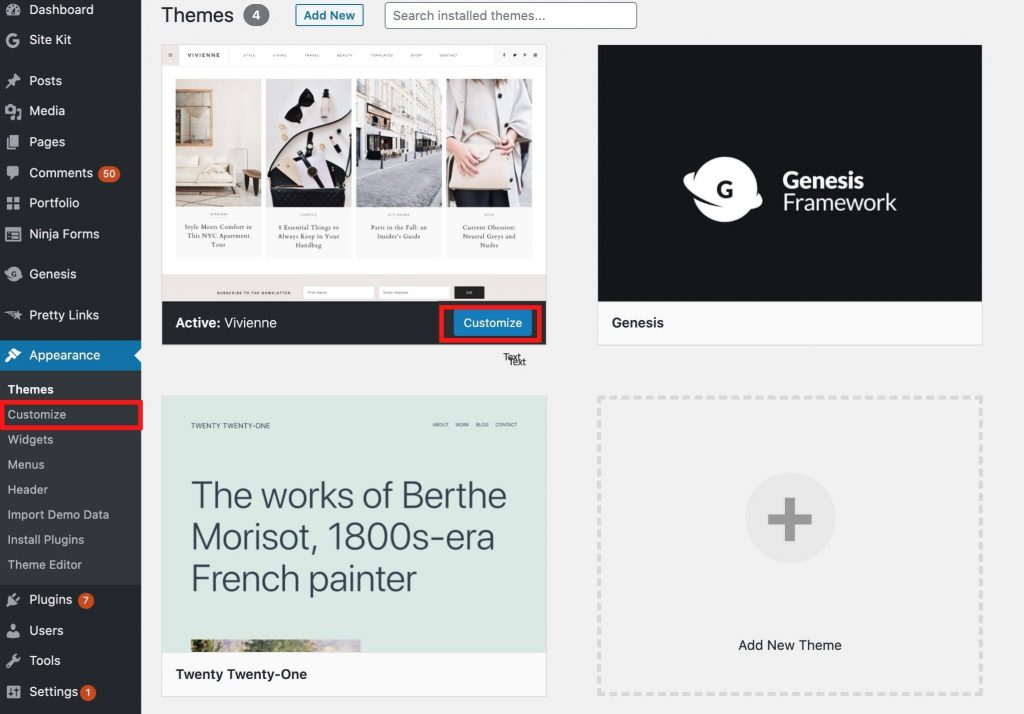
The screen where you can customize your theme looks something like this. Here you can change colors, add a logo, add menus, and many more things.
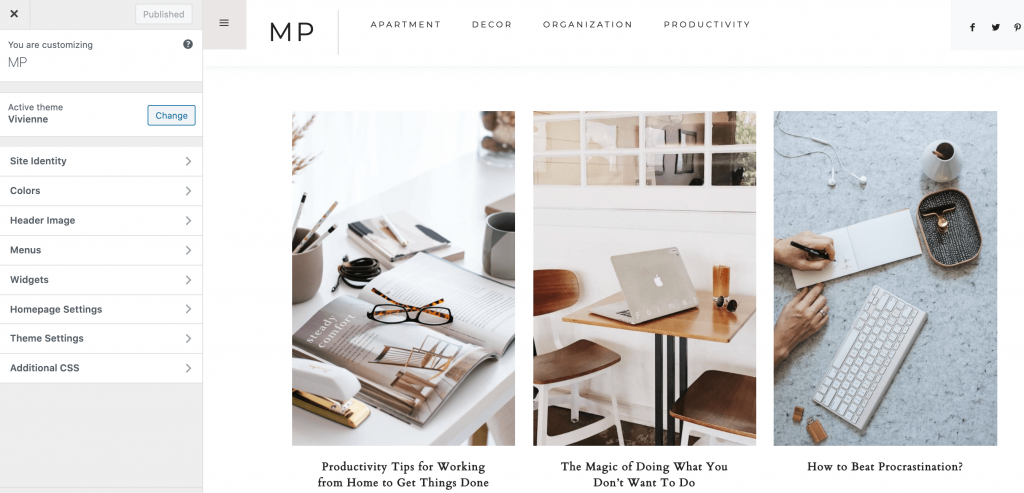
In the left bar, you can see the changes you can make to your theme. Below I’ll explain what each one of these does.
Site identity: Here, you can change the tagline of your site. It can be a short phrase about what your readers will find on your blog or what you’re about.
Colors: Change the colors of your links, buttons, post titles, and many other customizing options when it comes to the colors of your site.
Header: Add in an image as a header for your blog. Some themes also have options for the footer, which is the very bottom of your site.
Menu: The menu options depend on the theme you choose, but on mine, it lets me customize how the main menu appears, the offscreen menu, and the footer menu. I’m yet to figure out what is exactly. When you start, managing your main menu is what matters most.
Widgets: Widgets enable you to build different areas on your website. A WordPress theme comes with accessible text or link widgets, which you can easily drag and drop in the spot you want it to show. If you’re going to add a widget, go to Appearance > Widgets.
Additional CSS: Here, you can add pieces of code that customize things on your website that don’t have a standard setting. My theme provider, 17th Avenue Designs, has handy codes ready that you can copy and paste. For example, I used CSS codes to increase the font size in my posts and titles.
Tip: When you first install a WordPress theme, don’t forget to install all the demo content. That way, your theme will look exactly like the way it’s presented on the website.
10. Posts, pages and categories
These 3: your posts, pages, and categories form the foundation of your blog. This is how your readers navigate your blog, and you want to set it up efficiently.
I encourage you to think through your blog categories. Although you can still change those later, getting it right from the start is nice.
Posts
We’ve talked about those above: your posts are the lifeblood of your blog! In the left sidebar on WordPress, you click on Posts > Add new to start writing a new blog post.
Pages
When you have a new blog, taking care of your pages is a great idea. You use a page for timeless content. Like:
- About page
- Privacy Policy
- Contact
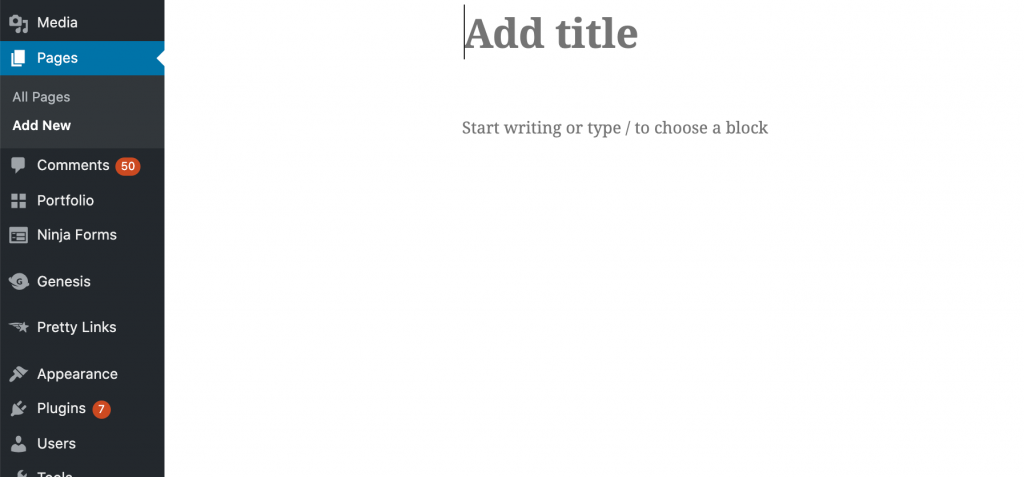
Below you can see an example of how to make an about page. When you’re done, click Save Draft. You can also immediately hit publish if satisfied with your writing.
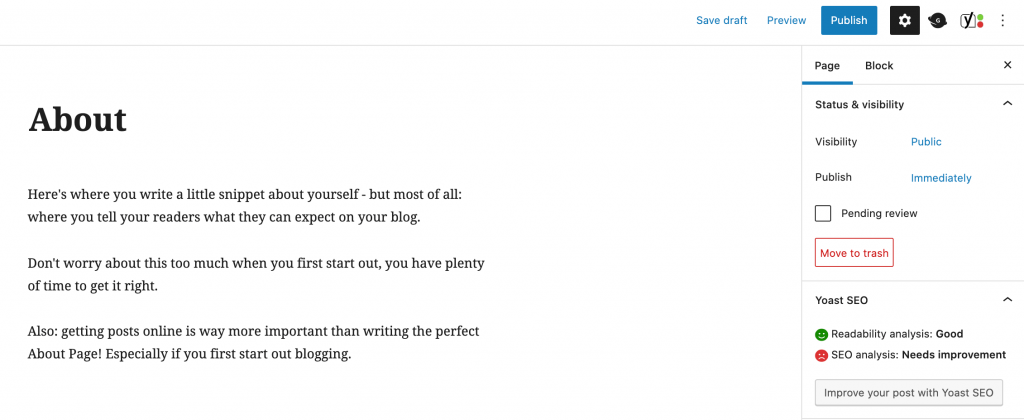
About page
Writing an about page often is a struggle for new bloggers. What do I even say? How do I define myself? The good thing is: your about page doesn’t have to be about you. See it as the spot on your website where your readers learn more about what they can expect from reading your blog and how you can help them.
Also, critical: your number 1 priority should be to get as many quality posts online as possible during your first year of blogging.
Along the way, when you have a better idea of what you’re doing and why you’re doing it, that amazing about page will come about naturally.
Legal pages
When you start a money-making blog, you must use legal pages.
The three most important ones here are Privacy Policy, Disclaimer, and Terms and Conditions.
You don’t need a separate page for each one. Instead, it can be easier to have all 3 on the same page.
Privacy Policy
Your Privacy Policy discloses the different ways you use the reader’s data. You do this to meet the legal requirement of protecting your reader’s privacy.
You can find a suitable Privacy Policy template here. My Vivienne template from 17th Avenue Designs comes with a standard Privacy Policy that you can customize.
Disclaimer
In a Disclaimer, you write that you can’t be held responsible for the content readers read on your website. So if you write about healthy nutrition, clarify in your disclaimer that this information can’t be taken as medical advice.
Check out this post for more info:
How to write a blog disclaimer
Terms & Conditions
The terms & conditions on your blog serve to clarify for your readers how you make money with your content. An important one is affiliate marketing. Always mention in your posts that it might include affiliate links and that you might earn a commission.
Check out this post for more info:
Terms & Conditions template
Categories
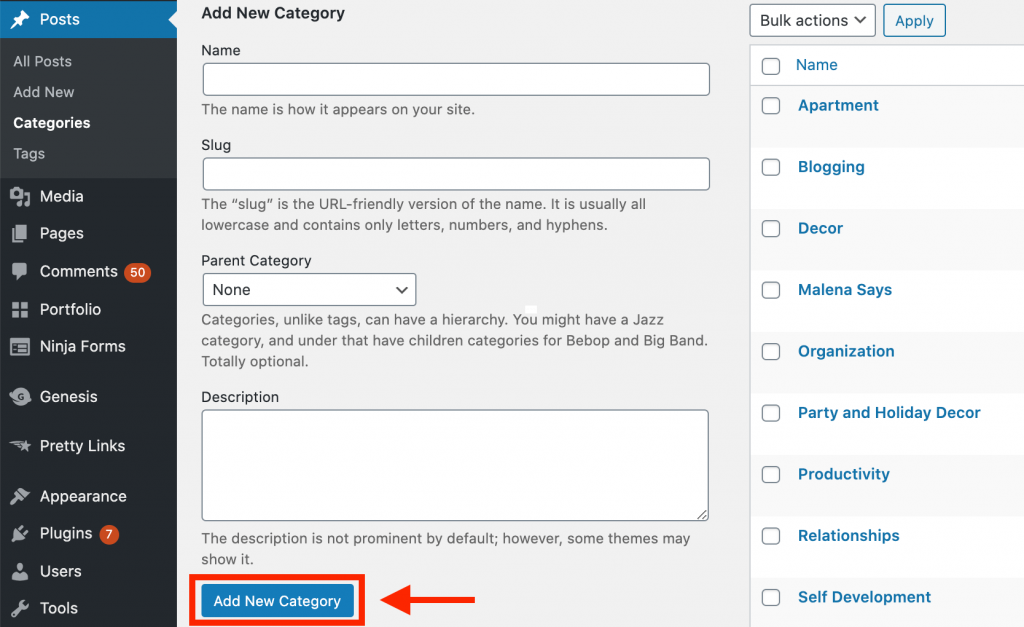
Go to Posts > Categories to add a new category to your blog. My template came with many categories in it, but you can delete or add as you go.
At the start, the fewer categories, the better. It helps you stick to your niche, making it easier for your readers to find all the content they want to read.
Keep in mind that how the category page looks differs per template. On my template, it shows like this:
Adding categories to your primary menu
Now that you’ve got a couple of categories on your site, you also need them to show up where you want them to.
Go to Appearance > Menus > Categories.
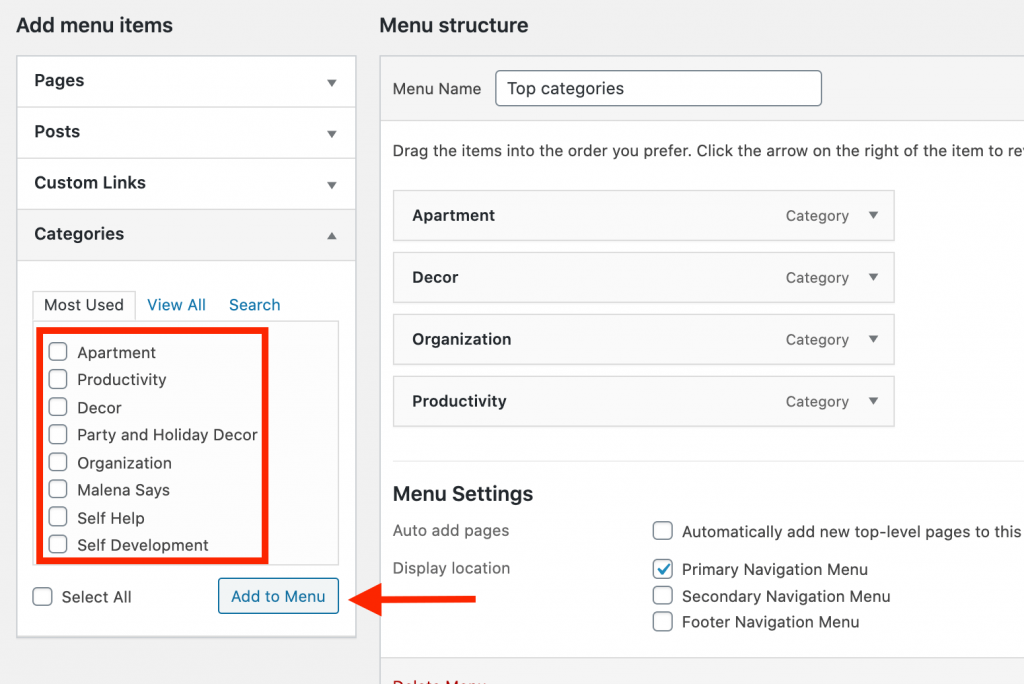
In the left bar, you see all the categories you’ve created for your site.
You can now decide what you want to be your main and subcategories on your menu.
The primary menu is the menu at the top of your site. This is the place readers often use to navigate from one category to the next.
I want to place the category ‘Party and Holiday Decor’ as a Decor subcategory. I then add that category to the menu and drag it in the middle under decor. That way, it automatically becomes a subcategory.
Take Action
- Pick a domain name. Choose a name that’s catchy, timeless, and easy to remember. You can also pick a name related to your niche for extra SEO juice.
- Buy your hosting. Self-hosting is a must if you want to make money blogging. Click here to get your domain name and hosting up and running.
- Learn all about WordPress. Look around and familiarize yourself with the main settings and options. Don’t worry; this will come with time!
- Customize your blog. You first need a theme. Do research this because having a theme you don’t like or are not versatile enough is a waste of precious time.
- Set up the essentials. Set up your categories, navigation, about page, and legal pages. Don’t worry: it doesn’t have to be perfect!
- Write your first post. The sooner you can get your first post(s) online, the better.
Get your domain + hosting today!
It only takes a minute to register your domain name and purchase your hosting with Bluehost. This is the hosting company I used when I first started my site. When you get a hosting plan for at least a year, you get a FREE domain name!
[Get Domain and Hosting]
Chapter 3
How to make your content go viral
People want to sell you the idea that you can make a ton of money from your blog overnight. Words like “viral” and “clicks” or “view” ultimately don’t mean much if you don’t make money.
To create a blog that makes money, you must build it on a lasting foundation.
THE way to do that is to prioritize sharing posts that give value to your readers.
It’s not as simple to say, “write about what you’re passionate about,” but it kind of is. I’d say: “write about what you like and that people search for.”
When writing content, remember that it should not be about you but how you can best help your reader.
The key thing is to write about things that people SEARCH for.
Who are you writing for?
Let’s take the example of a home decor blog. You want to craft a clear idea of the type of person you’re writing for.
- Is this home decor blog for young people who’ve just moved out or for people living in a big home with a family of 5?
- Do you write for people with a small budget or the type of person who doesn’t mind spending $500 on a tiny rug?
- Does it have a minimal approach, or the more, the better?
If I were to describe in one phrase who I write my home decor posts for, it would be:
The conscious career woman values saving money over splurging on decorating her apartment. She has great taste and will look for beautiful but affordable items that look expensive.
This also goes back to choosing your niche in Chapter 1. I want to point out that when you first start, you might not have a crystal clear idea of who you’re writing for. That’s normal, and you’ll grow into that with time.
Just always keep the question in mind when writing your posts: who is this article aimed to help?
Now let’s take a look at my favorite tools to help you narrow down what you’ll be writing about.
1. Look for relevant topics on Pinterest
Pinterest is a great tool for getting in touch with current trends and what people search for. In Chapter 4, you can read more in-depth about Pinterest.
Here’s an example of using the Pinterest search bar to get inspired for topics people search for.
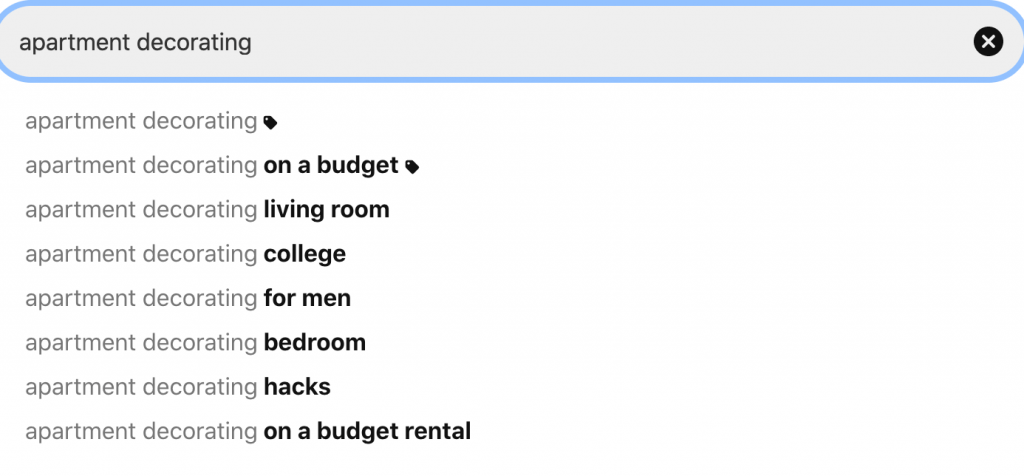
I typed in ‘apartment decorating,’ and Pinterest will complete the sentence with the most popular sentences people search for.
A great way to get inspired!
Now I’d like to see which pins show up when I click ‘apartment decorating on a budget.’
Here you can get an idea of what pins are popular, what type of keywords they use and which pins you like.
When you scroll down a page of a particular search time, like ‘apartment decorating on a budget, you’ll also come across more sneaky keyword suggestions. That looks like this:
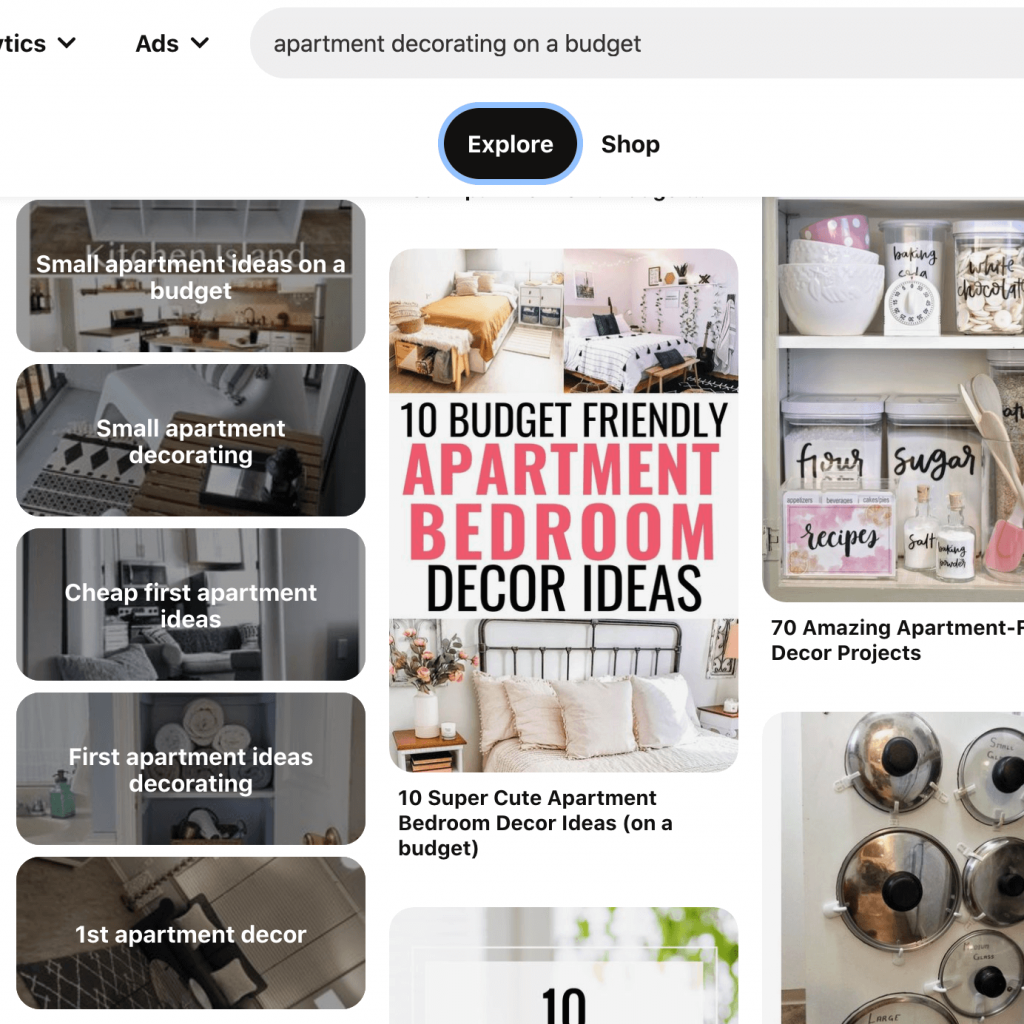
On the left, you can see some powerful keywords related to ‘apartment decorating on a budget.’
Play around with this to get inspired for your blog posts.
2. Let Google finish your sentence
One of my favorite ways to find out what people want to know is to type in half a sentence in Google and see what it says.
When I type in small living room ideas, google tells me small living room ideas for furniture and small living room ideas for Christmas (amongst many others).
Also, don’t forget to scroll down the Google page. There you will find related queries to the phrase you Googled. Here’s what it tells me when I chose small living room ideas for Christmas.
Related searches example:
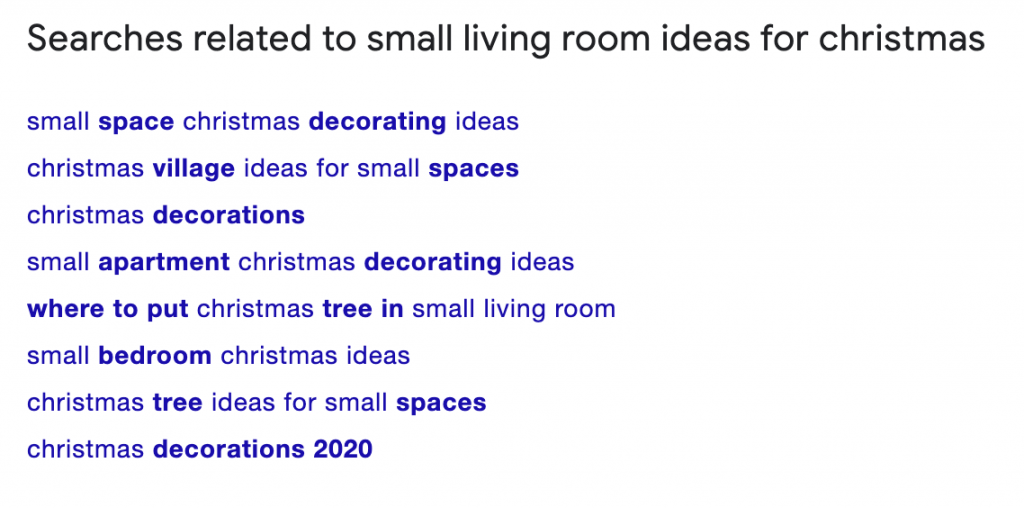
That gives me plenty of interesting content ideas! the keyword small living room ideas is very competitive on Google. But as a new blogger, I have a good chance to rank for some long-tail keywords.
Now let’s look at the next tactic, which is very powerful in combination with Google-related searches.
3. Use KeywordsEverywhere for long-tail keywords
I started using Keywords Everywhere a few months ago, and it’s been super helpful.
You install the app in your browser. Then when you research potential article topics on Pinterest, it instantly gives you suggestions for related keywords, “people also search for,” and long-tail keywords.
It looks like this:
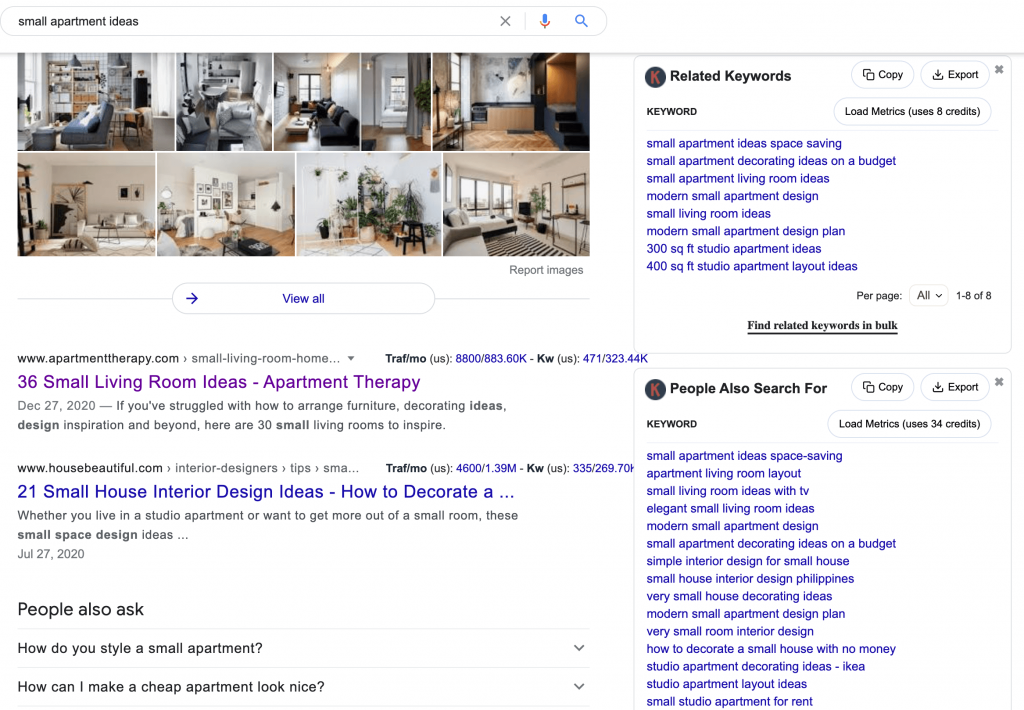
I searched in Google for small apartment ideas, and on the right side of my screen, I now get:
- Related keywords
- People also search for
- Long-tail keywords (not seen in screenshot)
This is valuable because, as a new blogger, it will be hard for you to compete with a keyword like small apartment ideas.
That doesn’t mean you shouldn’t write a post about small apartment ideas. Just make sure you also write plenty of posts about related keywords that are less competitive, like small living room ideas with TV or small bachelor apartment ideas.
This is why I love using Keywords Everywhere because you can easily plan ahead posts within your niche. Plus, you know that you are writing about things people search for!
4. Check your competitor’s ranking keywords on Moz
It can be super helpful to see what keywords your competitors rank for. Moz gives you ten free monthly queries, which is good enough when you start blogging.
I’m interested in starting writing more about self-development, and I want to know what type of questions people ask Google about this.
I typed in the website Tiny Buddha, and now I immediately get a list of the most important keywords this site ranks for.
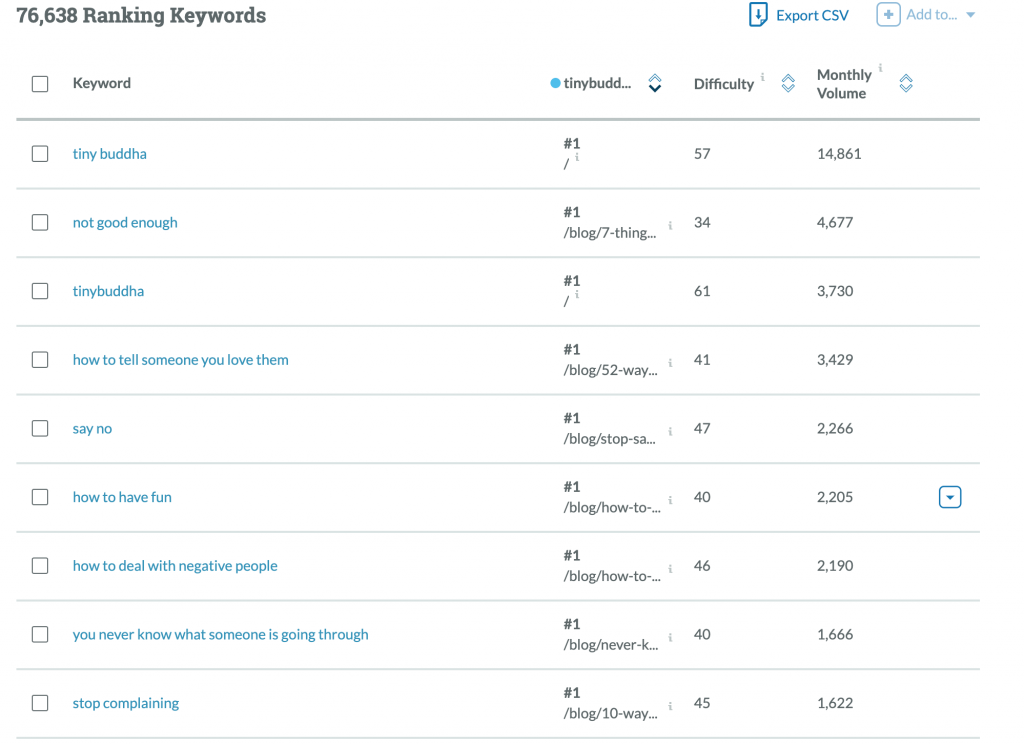
Whatever your niche is, you want to look for keywords with a decent monthly search volume with a difficulty level, preferably under 40.
As you can see in the list above, the keyword ‘not good enough could be interesting for me to write about.
Moz lets you download the list with information, which I keep in a folder with the rest of my keyword research. This brings me to the topic of organizing your ideas!
Organize your content ideas
Now that you know who you’re writing for and have found some interesting keywords in your niche, it’s time to organize your ideas.
This is how I organize my ideas in Google docs:
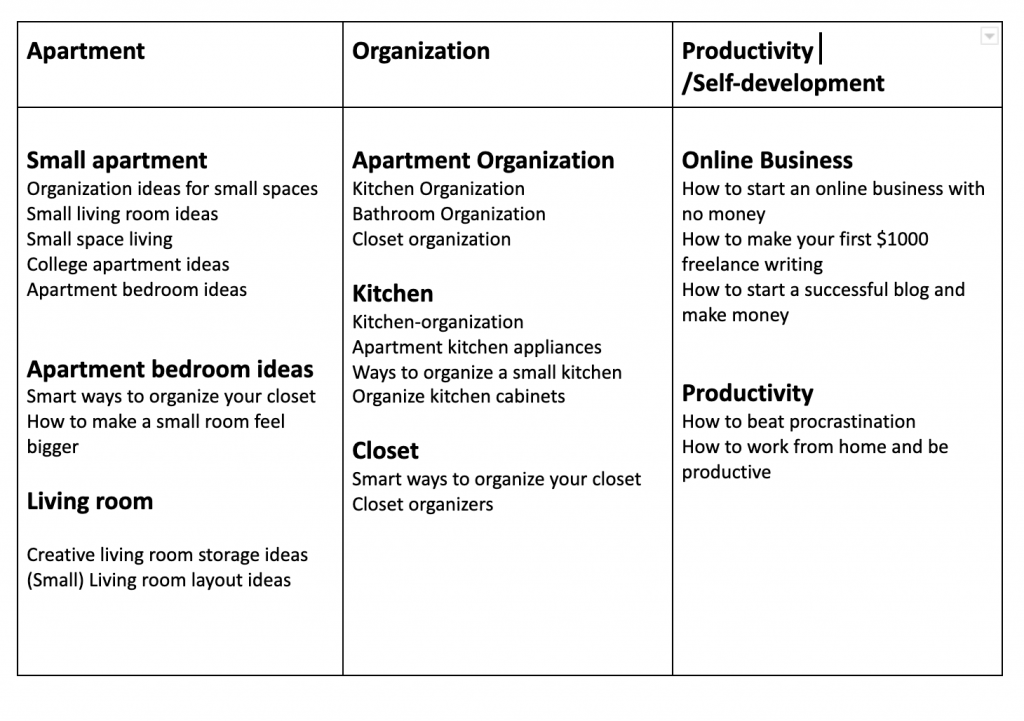
Go to Google.docs.com > Insert > Table and click on the number of squares you need for your table. Mine is 3×2. Then drag the size as you please.
At the top, write down the pillar topic. A niche should ideally have between 3-5 main topics. But feel free to ignore that if you have a better idea.
As you can see, under my pillar Apartment, I subcategorize room by room. Some of the Apartment content ideas overlap with organization. That’s OK (if not even better, because it makes it easy to interlink content).
Then I have my Productivity/Self-development pillar. This includes blogging, creativity, online business, productivity tips, and a yet-to-define category about self-development topics.
My process for organizing content ideas
Brainstorm: Before you do google research, start with yourself. What are topics within your niche you’d like to write about? What would the title of this post be? Make a list and make sure it’s topics your readers will find helpful.
Get inspired: Explore your content ideas with the tactics described above. Type in the phrase of the post you’re interested in writing about and see what content shows up in Google. If you’ve installed Keywords Everywhere, you also get an idea of how much traffic these posts drive per month. Explore your content ideas with the tactics described above.
Group ideas: Now organize your thoughts by putting them together in subtopics. For example, if you have a home decor blog, you can categorize them by room or home type.
Use a spreadsheet (seen above): Next, you create a little spreadsheet to organize your content ideas. I use a simple table. I use tables like that for each category and my monthly content and another one with undeveloped ideas.
Create your first blog post
Now it’s time to create your first blog post! In the left sidebar of your WordPress dashboard, go to Posts > Add New.
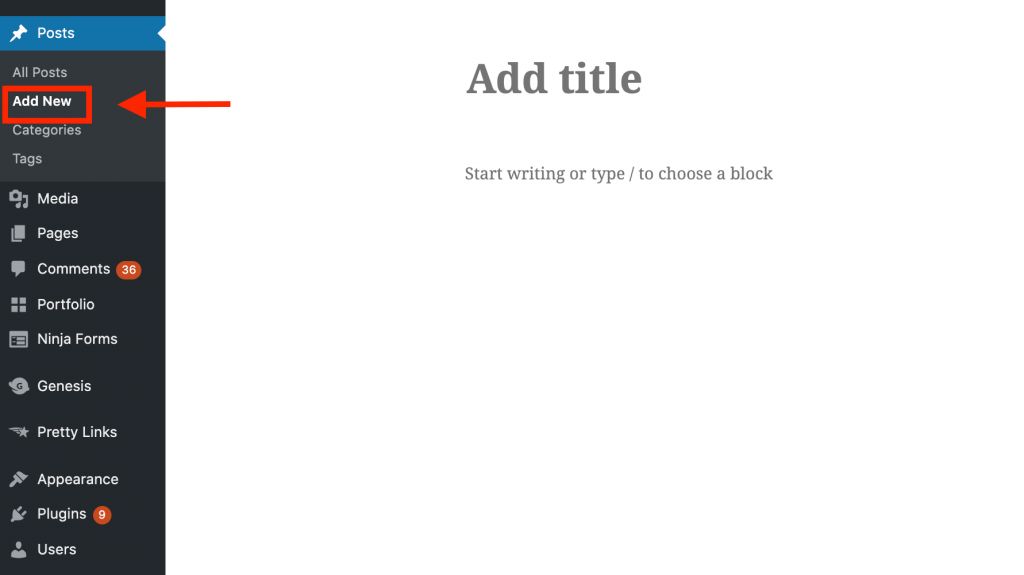
Don’t forget to save your draft immediately after picking a title.
Also, remember to choose a Google-friendly URL. The shorter, the better. I discuss the importance of selecting your URL in this post about Blogging Tips for First Year Bloggers.
The power of a good headline
A good headline is crucial if you want to make your content go viral.
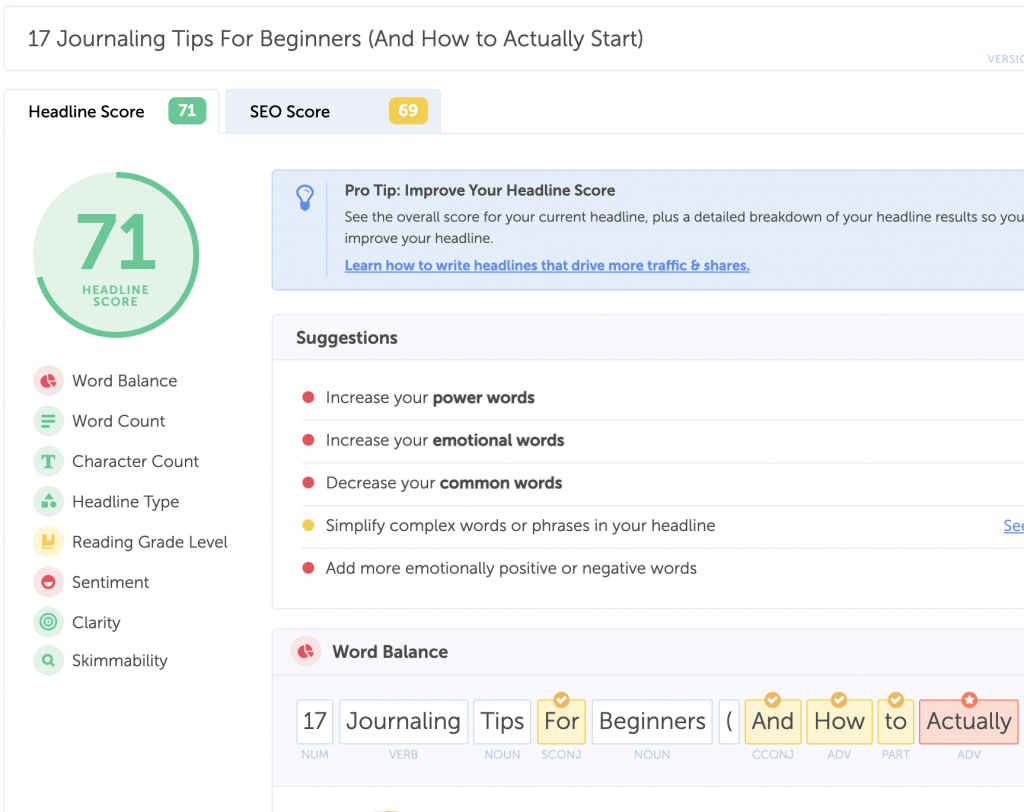
I’ve been using Coschedule (it’s free), and I love how it helps improve your headlines.
My rule of thumb is to only go for headlines that score 70 or higher. There is a formula for articles that get clicked on a lot. Coschedule explains the science and shows you how to improve.
Clicks to your article are the first step to making money from your blog, which is why you should pay great attention to your headlines!
How to structure your posts
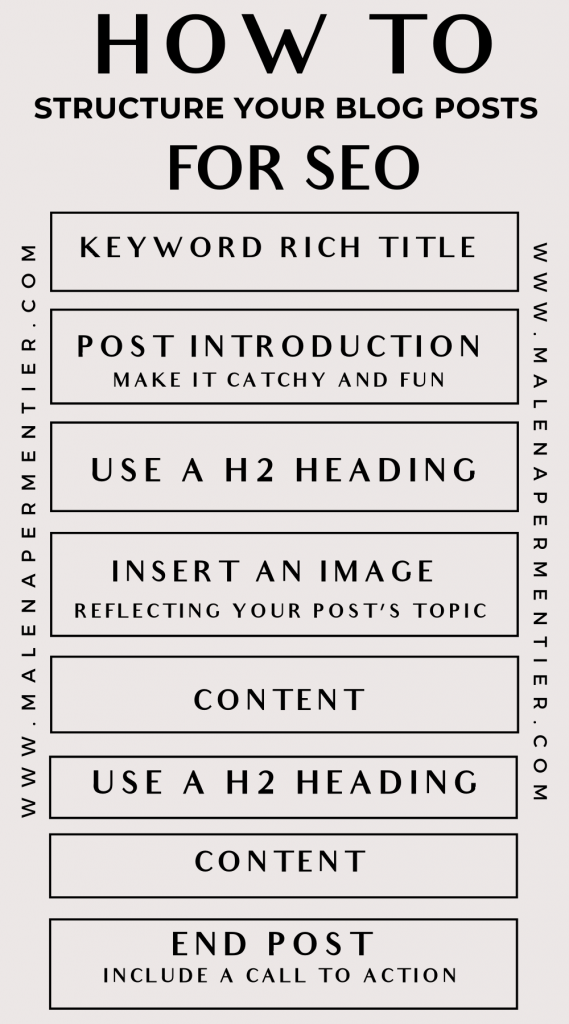
A reliable post structure will have your readers returning and what Google loves.
In WordPress, you can make headings in sizes H2, H3, H4, and more.
Include an H2 for each subchapter, then use H3 for sub-sub chapters. This infographic will help you visualize it:
Should you have an x number of posts on your blog before you launch?
I’m on the team “the sooner you can launch, the better.” So get your blog online with just 1 post.
Starting a blog when you know nothing about it is a messy process. You can learn fastest by getting that first blog post online.
If you’re a person that loves a system and good organization for learning, then, by all means, create 5-10 blog posts before you launch.
I’m more of a see-and-learn person, so I went live with just 1 blog post.
How many words should a blog post have?
Keep in mind a minimum of 500. With less than that, it will be hard for Google to take you seriously.
Google values in-depth content over shorter articles, so if the topic is extensive enough, aim for 2000 words.
Take Action
- Get clear who you’re writing for.
- Use tools like Keywords Everywhere, Pinterest, and Related Google searches to define what’s worth writing about – what type of content do people actually search for?
- Get really skilled at writing great headlines: use Coschedule to keep improving.
- Always add value: don’t write posts to get content online. Only write super helpful content that people actually want to read.
Chapter 4
Learn everything about Pinterest
Why? Because Pinterest is your holy grail, access to boatloads of traffic while you’re still in the early stages of your blog.
In the first 6 months, you will likely not drive much traffic from Google. It takes time for Google to start picking up on you, even if you use less competitive keywords.
That’s why my #1 recommendation for new bloggers is to get serious about learning everything there is about Pinterest.
There are a lot of courses and free advice out there. But one thing I’ve noticed (test and tried) is that people with established Pinterest accounts need a different strategy than complete newcomers.
Below, I will take you to the most critical steps of making a Pinterest powerhouse account driving traffic to your blog.
Why do you want traffic?
In the beginning stages of your blog, affiliate marketing is likely your most important source of income.
To increase your chances of getting sales, you want to get as much traffic to your site as possible.
I’ll tell you more about how to make money in Chapter 5; let’s first look at what Pinterest can do for you.
People on Pinterest are in a different mood than Instagram users. They’re actively collecting ideas for their home, inspiration, and shopping ideas. 47% of Pinners log onto the site to shop.
They’re also much more likely to click on an outbound link.
Instagram is designed for users to stay on the platform as long as possible. Pinterest actively encourages readers to visit sites off the platform.
That’s what makes Pinterest so powerful in terms of driving traffic. Remember, traffic to your site equals sales!
I have several posts that do INCREDIBLY well, just because 1 pin got shared hundreds of times.
What is Pinterest exactly?
Pinterest is a visual search engine. Unlike social media platforms like Instagram, Pinterest actively encourages users to visit the websites of their platform.
You can compare Pinterest to a bookmarking tool, where you save things that inspire you on boards. You can create boards for creative business ideas, home ideas, recipes, personal style, or whatever else you’re interested in.
As a blogger, you create Pins for your blog posts. These Pins include the link to that blog post, which gets people to land on your website after clicking on it.
The purpose is to create Pins that people love and will want to re-share. But most importantly, you’ll want to make pins that people WANT to click on!
A few years ago, Pinterest was more of a ‘gathering’ platform. You repinned other people’s pictures and some of your own, et voila, that’s how you got followers and traffic.
Now you have to develop a more solid strategy to utilize Pinterest as a traffic-driving tool.
Set up a Pinterest business account
When you start using Pinterest as a business, make sure you convert your account to a business account.
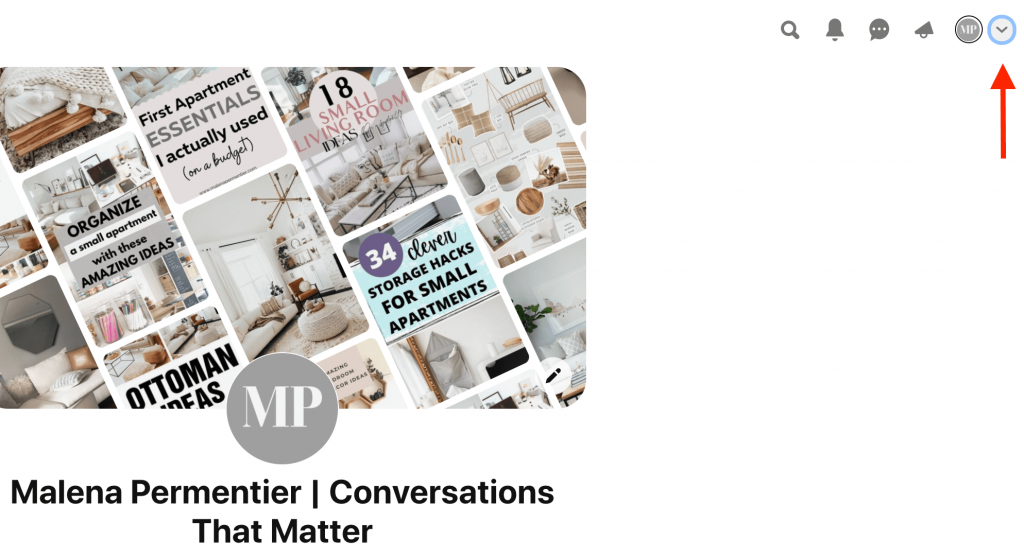
- Login to your personal Pinterest account and find the little v in the right top corner.
- Click on settings, then on account settings.
- Find ‘convert to business account‘
- Now click on switch to business.
It’s that simple!
Important Tip:
If you’ve been using your personal Pinterest account for years and there is a lot of random stuff on it that doesn’t align with your blog’s main topic, opt to create an entirely new Pinterest account instead.
Set up your profile
Now that you’ve got a Pinterest business account, it’s time to edit your profile.
Write something that reflects the topic of your blog, and make sure to use keywords.
The things you’ll want to edit are:
- Display name: Write your name and a catchy phrase that represents what your website is about.
- About your profile: Use this space to explain sweet and short what people find on your Pinterest account and blog. Make sure to align your blog posts’ content topics with the names of your boards and keywords in your pins.
- Your photo: I put my website’s logo instead of my picture because I find it best represents the current topics on my website.
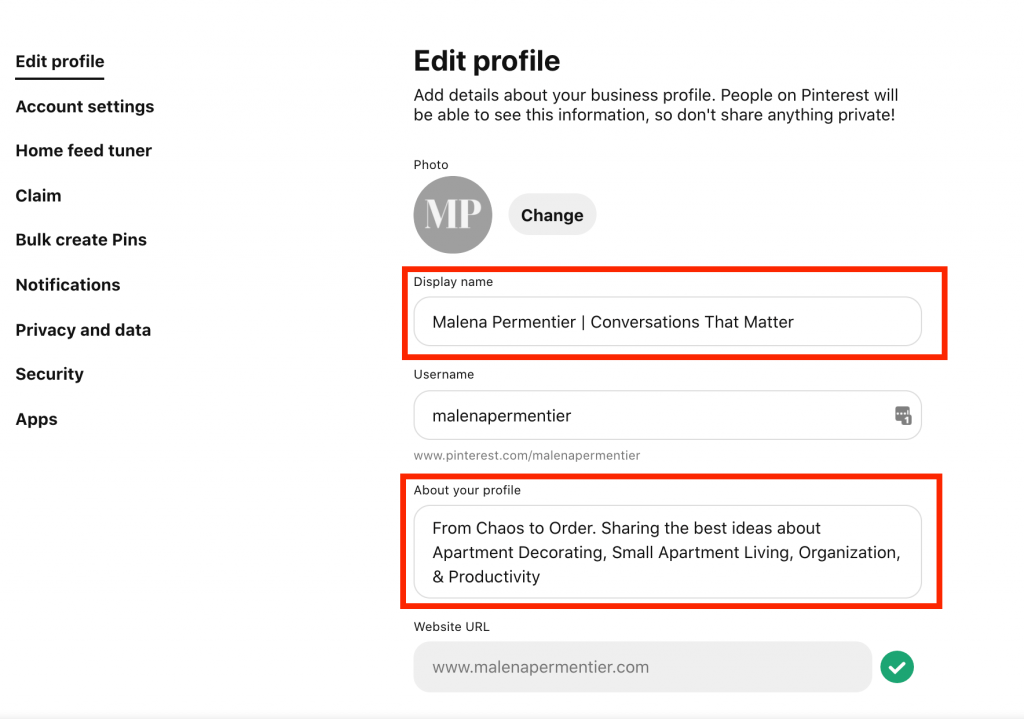
You’ll likely edit this part of your Pinterest profile many times, and that’s fine. I must have changed it at least 5 times in the last 2 months!
When starting, don’t overthink it and just write what feels natural about you and your blog.
Setting up Rich Pins on Pinterest
Rich Pins are a feature that enables content creators to include extra information on their pins. This happens automatically after enabling the Rich pins feature.
To set up rich pins, you have to add some code to your WordPress site, which Pinterest will validate.
If you have the Yoast SEO plugin (it’s free!), you can simply add the code in there and then use the Pinterest Rich Pin Validator.
This post explains very clearly how you can set up Rich Pins in the Yoast plugin. It’s the same way how I have done it for my site.
Creating boards
When creating Pinterest boards, be as specific as possible when it comes to the board’s name.
Although it’s OK to have some boards with general names like ‘home’ or ‘apartment,’ you’ll also want boards with specific names. This goes for any niche.
On your profile, click on the + and then click on the board.
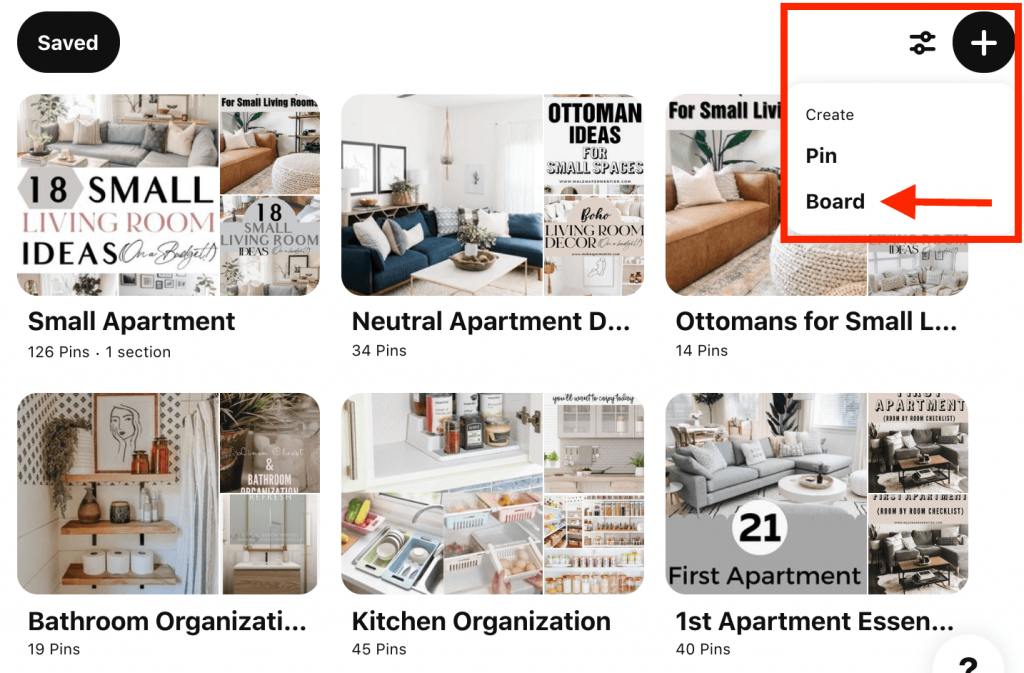
Next, Pinterest will ask you if you want to save some ideas for your new board. I’d leave that for now.
Let’s first make sure that we set up our board correctly with the right keywords.
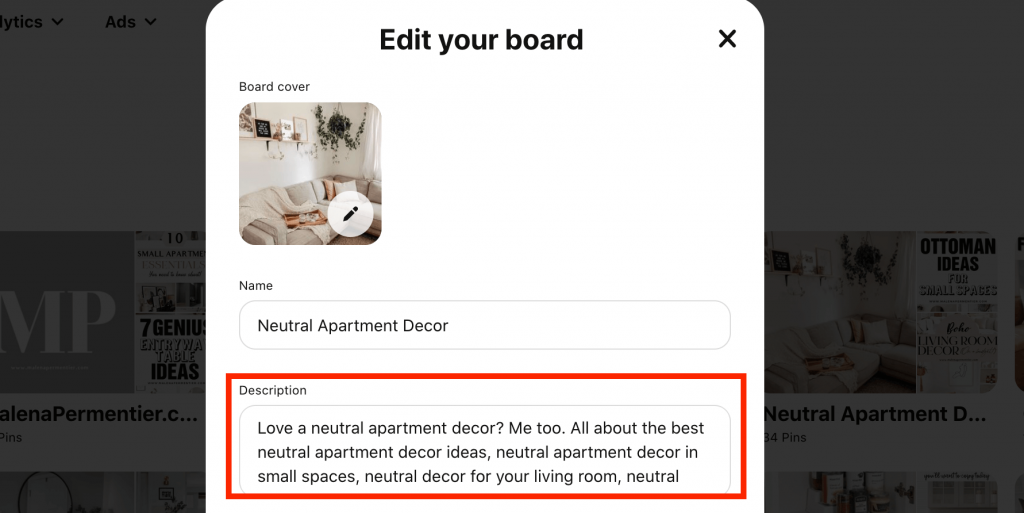
Use the board description space
In the description box, you can write a few lines about your board. Make sure that you use lots of relevant keywords.
Below, let’s look at my board description for Neutral Apartment Decor.
Here are 3 things I do:
- I make sure to use my board’s name in the description as well.
- In the board description box, I also alternative phrases that people might be looking for. When it comes to Neutral Apartment Decor, that might be Neutral Apartment Decor Ideas or Neutral Apartment Decor in Small Spaces.
- I include a few relevant hashtags, like #neutralapartmentdecor and #neutraldecor
What I’ve noticed is that Pinterest LOVES it when everything adds up. It will prioritize showing your pins on people’s feeds. For you, this means clicks > traffic to your site > affiliate sales > money.
This is how that works:
- I have a blog called The 25 best Neutral Apartment Decor Ideas.
- I make a Pin that includes that same keyword, Neutral Apartment Decor.
- Make sure that the image in the Pin also reflects Neutral Apartment Decor.
- Then, I save that Pin to the board called Neutral Apartment Decor.
- The Pinterest Alghoritm now doesn’t doubt that your Pin truly is about Neutral Apartment Decor because every possible pointer points there.
Think about the keywords
For every blog post you create, keep in mind the #1 keyword you’re aiming at. Then, use that keyword consistently in your blog post title, pin name, image name, board name, and any other place to include your keyword naturally.
10-15 boards is an excellent place to start, especially if you don’t have a lot of content on your blog yet.
How many boards to start with
As a rule of thumb, create 5 generic boards (words like apartment or home) and 10 specific boards (words like kitchen organization or small bedroom ideas)
How to use Pinterest in 2023
Pinterest changes quickly. Its algorithm has become a lot more advanced, which means that a natural style of posting your pins is key.
A few important things to keep in mind:
- Pin each pin only to 1 board. For example, a pin about small living rooms should go on the small living room ideas board.
- Don’t pin to the same URL too many times. Make 2-3 pins for a new post and schedule them with time in between. Then leave that URL alone for at least a few months.
- Prioritize creating the best-looking pins that encourage people to click! This is still the #1 way to success.
- Use plenty of natural and effective keywords in your pin image, title, description, and hashtags.
- Limit your group board participation to only specific boards that truly align with your blog’s niche.
What is the best Pinterest schedule
As a new blogger starting on Pinterest, focus on quality over quantity!
There is outdated Pinterest advice that tells you to get as many new pins out for your posts as possible.
I did that for the first couple of months, and it was a huge failure.
The extent to which Pinterest tends to show your pins to other users depends on how much engagement your pins get.
So if you pin 30 of your pins in a week, and most are not getting 1 repin, you’re delaying your Pinterest success.
Pinterest schedule for new bloggers:
- Get 5 blog posts online.
- Make 2-3 different pins for each post.
- Post 2 new pins of different posts each day.
- Pin 2-5 relevant quality content of other pinners to your boards.
When you first start with Pinterest, it’s OK to Pin other people’s pins to your boards.
That way, it’s easier to show Pinterest what your board is about. Just don’t overdo it.
Think 5-6 pins of other people when you’re building a new board.
When pinning other people’s pins, check the link to be sure it’s not spam. Also, check if the keywords in the title, description, and image match up nicely.
What are new pins exactly?
There are 2 types of pins that Pinterest considers new:
- New pins related to a new blog post
- New pins for an old blog post
When I have a blog post that does well, I occasionally make a new pin for it.
You can make new pins for an old blog post; Pinterest still sees this as a fresh pin.
The other great thing is that you don’t have to develop brand new designs every time.
Once you have a couple of templates that work, you can change the image and the text.
How to create beautiful pins
The place to create beautiful pins EASILY is Canva. Like anything else, it takes some practice to get your pins 100% right.
Canva has a ton of free templates you can use. It works with a simple drag and drop concept so that anyone can create a good design.
Creating great pins that drive tons of traffic to your website takes time and effort. I surely didn’t get it right at once.
But when I did, that one pin design consistently drives me over 500 visitors to that particular blog post per month.
Here’s an example of a good and a bad pin design.
I personally use Canva Pro, and I highly recommend it to bloggers. You get many more templates, stock images, and folders to organize your designs.
In Canva pro, you can also add your own fonts and branding colors.
If you’re starting out, it’s absolutely fine to use the free Canva version. But as you get more serious, Canva pro is amazing.
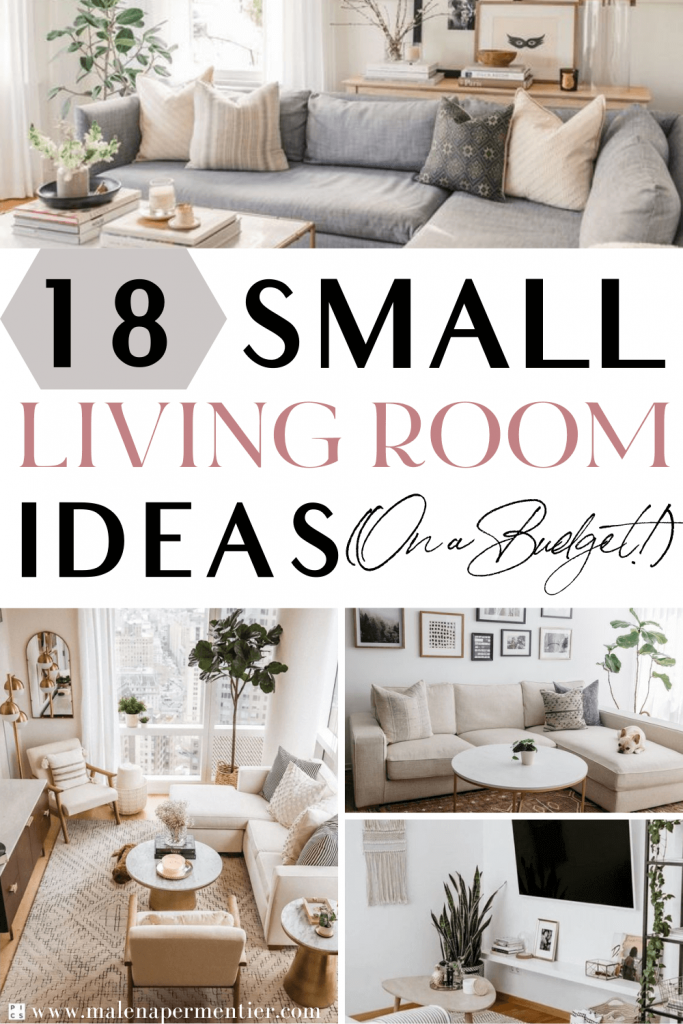
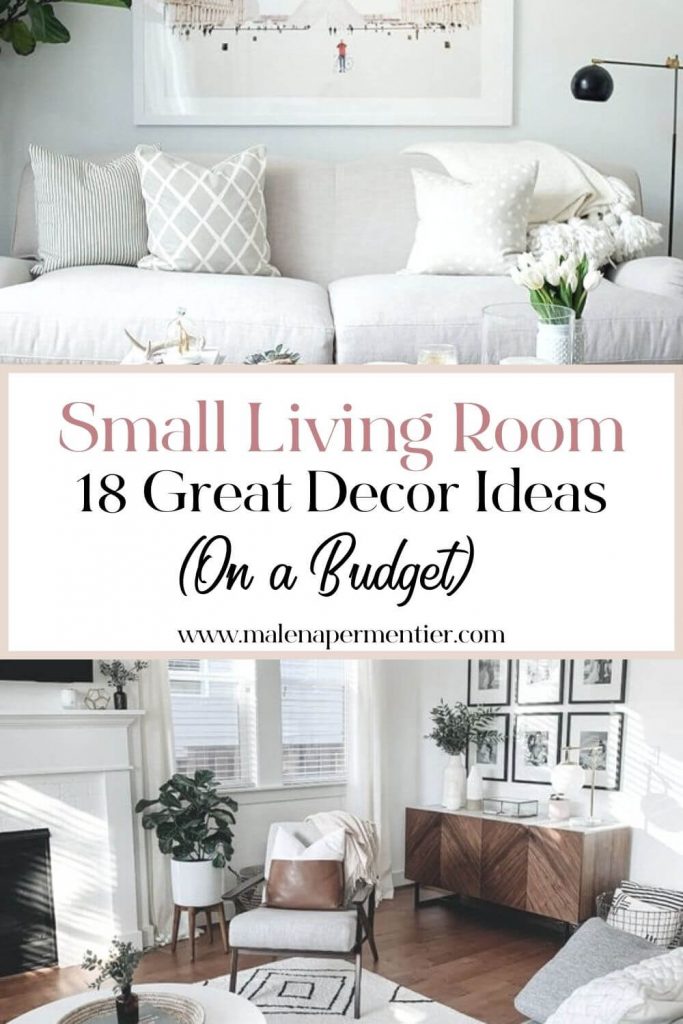
I made both of these pins for the same post about small living room ideas. The difference is that one of them drives a ton of traffic to my post, while the other one has 0 outbound clicks and 0 saves.
While it’s not always 100% entirely in your hands which pins take off and don’t, there are some pointers about what works.
Key tips for a great pin:
- Large text: Make the text of your pin large, compelling, and include the same keywords as your blog post.
- Relevant images: Curate the images you use for your images like your life depends on it.
- Use beautiful fonts that are easy to read.
Now let’s put these tips into a step-by-step guide on creating the perfect pin that people want to click on.
How to create great pins step by step
- Use the recommend pin size of 1000×1500 pixels: long pins catch people’s eye and help you take up the space on people’s feed to grab their attention. I sometimes prefer an even taller pin size, like 1000×1700 or 1000×2000.
- Use images that reflect the topic of your pin and blog post. If that’s small living rooms, show us a pretty small living room!
- Use easy-to-read, eye-catching fonts. A good font makes all the difference for your pins. Canva has plenty, but also don’t hesitate to upload a font yourself.
- Choose a light background with bright colors. These pins generally work a lot better.
- Create the perfect title. You’ll want a title that captures people’s attention and reflects the topic of your blog post.
- Include a description. Use the little space to describe what your pin is about. Don’t forget to include relevant hashtags.
- Include your blog’s logo or link on each pin. You’ll want people to know your blog’s name. That way, people can’t just use your pins as their own.
Take action
- Get your Pinterest account online and set it up the right way with a profile picture and a short but sweet keyword-rich description of what your account is about.
- Save your pins to the most relevant boards. Repin a couple of quality pins of other accounts to give your boards context.
- Create amazing click-worthy pins. Focus on quality over quantity. Taking 2 hours for 1 great pin is a lot more effective than creating 20 pins that barely get clicks.
Chapter 5
Learn the art of good SEO
What is SEO?
To create a successful blog that makes money, you need to master Search Engine Optimization (SEO).
SEO is the art of making each blog post reflect the keyword that you want to rank for effectively.
Truthfully, SEO is a vast topic that you don’t learn in one day. However, a few simple rules can help you give your blog post’s the proper foundation.
The most important way to start with SEO is with the Yoast plugin. You can download it under Plugins, and after you install it, it will analyze your blog post and tell you what it needs more or less of.
At all times, keep in mind that Yoast is simply a pointer. The most important job is still yours: to write quality, in-depth content that people want to read.
Search engines are becoming more advanced by the day, so always prioritize creating quality content.
Why is good SEO so important?
Good SEO is the foundation of making passive income with your blog. When your successful blog post attracts hundreds of visitors each month, it’s easy to start monetizing.
Traffic from Google is significant because:
- Engaged traffic. People that land on your blog posts are looking for something particular: often exactly the topic that your blog post talks about. That makes it a lot easier to make money through affiliate links.
- It’s passive income. You only have to create the blog post with affiliate links once. It feels super rewarding to see a post you created 6 months ago suddenly making money ‘overnight.’
- Google is has a more solid algorithm than Pinterest. If you start ranking for a keyword, it’s easier to maintain. Pinterest often changes, so that makes Google traffic extra valuable.
How to start getting traffic to your blog with SEO?
Driving traffic to your blog with Google takes time. Much more time than Pinterest. It will take anywhere between 6-12 months to start seeing some results from blog posts you wrote months ago.
That’s why the beginning phases of starting your successful blog are so tricky: it seems like nothing you do is working!
This visual by Jack Butcher from Visualize Value sums it up best:

Okay, you get it: it takes time. But what can you do today to set the foundation for driving traffic from Google to your blog?
1. Do your keyword research
As a new blogger, it’s tough to start ranking for keywords. That’s why the fastest way to start driving traffic from Google is by identifying long-tail keywords that enough people search for each month.
I’ve talked about this in Chapter 3, where I share my favorite ways to find keywords to write about.
Pinterest is by far the easiest way to see what’s currently trending and what people search for.
2. Think in pillars
The way you start building value for your readers and Google is by thinking about pillars. As a rule of thumb, aim for at least 10 quality posts within 1 pillar.
When I plan content for my main apartment decorating category, I’ll define a pillar or subtopic.
I like small living rooms because 1) lots of people search for them and 2) it aligns with my target audience, and 3) there’s plenty to write about!
The small living rooms keyword is competitive. To increase your credibility in Google’s eyes, you’ll create a hub of posts reflecting that topic.
When you’ve identified a keyword you want to rank for, write at least 10 posts about that topic.
If small living rooms is your keyword, then you can, for example, write about:
- optimizing space in a small living room
- decor ideas to make a room feel bigger
- layout suggestions for a small vertical living room
When you have lots of content about a subtopic, it’s easy for Google to see your blog has something to offer.
The reason why a pillar structure is powerful is twofold.
In one way, you increase your chances to start ranking for competitive keywords.
Secondly, you’re also aiming at less competitive long-tail keywords.
3. Focus on quality content
The third thing that’s entirely in your hands as a new blogger is the quality of content you create.
Google the topic you’re going to write about to see what other sites are doing.
How can you make it better? What topics can you add? How many words do does articles have?
The pillar structure, as discussed previously, also helps increase the quality of your content by default. After all, you’ll have 10 or more posts about the same keyword.
For each keyword within a pillar structure, create 1 super in-depth post. Then support that post with several shorter posts and interlinks.
4. Backlinks
Backlinks are links to your blog from another preferably high-authority website.
This is a super important part of building credibility with Google. It’s also not easy.
One way that you can start building up your backlinks is by exchanging links with bloggers like yourself.
This in-depth guide about backlinks is super helpful if you want to learn more about backlinks’ science.
Other ways you can build backlinks:
- Share your content on social media. That way, you increase the chance of people finding you and wanting to re-share.
- Guest posting. By writing an article for someone else’s website, you might be able to link to your blog.
- Pitch your content to news outlets if you feel there’s a great match. There might be a story they’d want to include as a source. Sites like Help a reporter out is really helpful for this.
- Use Facebook groups to find like-minded bloggers. Many new bloggers need backlinks just like you. So take advantage of that.
Take Action
- Define your long-tail keywords and pillar content strategy.
- Write helpful in-depth content that helps readers solve their problems.
- Promote your blog! Keep your eyes out for great backlink opportunities, and don’t hesitate to reach out to other bloggers.
Chapter 6
How to make money from your blog
Yeahhh! You made it until here. The most important part of them all: how to make money from your blog.
Here are the ways you can make money:
- Affiliate marketing
- Display advertising
- Creating your own digital products
- Your own services (speaking, freelance writing, etc.)
- Offering a membership
I personally like affiliate marketing and display advertising the most. Once you set up your posts correctly, they don’t require much work anymore. That’s right: incredible PASSIVE income!
Earning passive income from your successful blog is great because you invest your time once and keep compounding over time.
After all, I want to work less and live more.
Next to affiliate marketing and display advertising, I love the idea of creating my digital product. For example, a course about Pinterest or affiliate marketing: a platform like Teachable is perfect for that.
Making money with affiliate marketing
As a new blogger, affiliate marketing is the easiest way to start earning money from your blog.
You’ll likely not have enough monthly users to make decent money from ads. That’s why I recommend focusing entirely on making money with affiliate marketing.
The great thing about affiliate links is that once they’re in your posts, they’ll be there forever.
That means a post you created a year ago can still make excellent money today, next year, and in 5 years. It’s all about long-term thinking.
Not only because it might take a while until you start earning but also because the power of your affiliate content compounds over time.
Display ads
My advice: don’t use Google Adsense. Instead, build your succesful blog until you have at least 10,000 monthly sessions to get into a better ad network.
Ad networks work with Revenue Per Impressions (RPM). 1000 impressions can earn you $10-$20. Not a lot, I know. This is how much you could make with more pageviews:
- 1,000 daily page views: $10-$20
- 30,000 monthly page views: $300-$600
- 45,000 monthly page views: $450-$900
- 100,000 monthly page views: $1,000-$3,000
I got my website into Mediavine in September 2022, which has truly been life-changing for my income.
Freelance writing
You won’t earn a living from your blog immediately, so why not use your blog as a vehicle to score freelance jobs?
Over the years, I’ve gotten many opportunities through my blog. For example: writing brand profiles, helping e-commerce companies run their blog, managing social channels, etc.
Maybe you’ve gotten to a point you don’t want to be employed anymore. When you don’t yet earn a decent living from your blog, explore freelance writing.
A platform like Upwork is great to find work like that. It will also teach you a lot of valuable skills you can implement for your blog.
Read my post about freelance writing and Upwork here.
Sponsored content
As I mentioned briefly at the start of this guide, I’m a retired fashion and travel blogger. For 3-4 years, I made a full-time income from sponsorships.
A sponsored post is a post you create in collaboration with a brand. For example, H&M pays you $5,000 to promote their new designer collab collection.
Depending on the type of brand you create sponsored content for, you’ll need to take pictures of the product and write an article to accompany it.
Most of these were retainer partnerships, meaning I create an x number of posts for them each month.
While sponsored content can be a great way to make money, I never want to depend on it again.
I much prefer a passive income framework over the not so passive responsibility of producing the sponsored content.
I’m not saying that I’ll never take on any sponsored content opportunities for this site; it’s just not my priority.
Selling your own products
Platforms like Teachable make it super easy for bloggers with particular expertise to sell their online courses.
Many people are interested in making money online. Since there’s so much to learn about, from writing to Pinterest marketing, creating great pin designs, graphic design, there are people who want to understand what you know.
I do not recommend selling your product in the first year. It’s much more efficient to spend time on your content and make money from affiliate marketing.
Once you have the audience and the expertise, you can start developing a product!
Some digital products I love:
- Courses (affiliate marketing, Pinterest, e-mail marketing)
- Printables (budgeting, content planning, etc.)
- Templates for pin designs
- Stock photo memberships
I started selling my digital products on Stan to my Tiktok audience, and I LOVE what it has done for my business.
You can find my Stan store where I sell my digital products here.
Chapter 7
Resources
Blogging Resources I Use That Make Me Five Figures A Month
There are plenty of resources that make your successful blog run faster and wiser. Most of these are for free, and they help you improve your blog without much effort from your end. I’m talking about plugins.
A plugin is a software that you upload on your WordPress blog. It adds extra features to your blog like analytics, downsizing images, improving SEO, and much more.
When you use a good theme, for example, from 17th Avenue Designs, all the great essential plugins will be downloaded for you automatically.
But not to worry, you can also easily download them yourself. Go to Plugins > Add new > Type the name of plugin > Upload > Activate.
Here are the free essential plugins I recommend:
Yoast
Yoast is a free SEO plugin that helps you improve your posts. It tells you exactly if you’re using enough keywords and your writing quality and gives you suggestions to improve your post’s SEO value.
Akismet Anti Spam
This plugin helps protect your blog from spam. It makes sure that spam comments don’t get published (and you’ll get a lot of those!).
Site Kit
The site kit plugin is connected to your Google Analytics account and gives you a quick, straightforward overview of current traffic, your most popular posts, and your traffic growth in the past week and month.
It’s beneficial to stay up to date with your site’s current movements. Sometimes you’ll see a spike of traffic on a particular post. You’ll also see the new keywords you’re starting to rank for in Google.
Pretty Links
Pretty links let you make your affiliate links look appealing. It’s a must-have if you’re going to start a blog that earns money with affiliate marketing.
Insert headers and Footers
Sometimes you’ll need to add code to your website. For example, to verify your website on Pinterest or for Google analytics. You don’t want to go into your site’s code if you don’t know anything about coding. Luckily there’s this insert headers and footers plugin that lets you copy and paste code snippets.
Smush
The Smush plugin automatically makes the images you upload to the media library smaller in size. Lots of large-size imagery can make your website run slower, so a Plugin like this is perfect for keeping your site healthy and fast. I also re-size all my images in Tinypng before uploading. Maybe I’m paranoid, but I’ve seen in the past how an image-heavy website can slow down your user experience.
